Cameras
Cordatus seamlessly integrates with diverse camera types, encompassing IP, CSI, GMSL, and USB cameras. This flexibility allows users to choose the most appropriate camera and integrate it with Cordatus for efficient video analytics.
Connecting a Physical Camera
Connecting on Web App
To use a a CSI, USB, or GMSL camera with the Cordatus Web App, follow these steps:
- Physically connect your camera to your device, for example, by using a USB cable.
- Install any required drivers, if needed. Refer to your camera manufacturer for detailed instructions.
- Open Cordatus Web App and go to the Cameras page.
- Click the + button on top to open a modal for adding a new camera.
- Choose Camera Type as Physical.
- Select a device from the Devices list, use Groups to find your device easily if you need.
- Select the connected Camera or Cameras from the list.
If you can't locate your physical camera in the list, click the refresh icon next to the "Cameras" label. If it still doesn't appear, try restarting the inference engine/ stream engine and refreshing your page.
- Assign a name to your camera in the Camera Label field.
- If you want to add your camera to a group, click the group icon and select the group that you want your camera to be added. If you want to add all of your cameras to add in the same group click Apply also for other selected cameras.
- To add location information and view your camera on the map (accessible through the map icon in the left menu), follow these steps:
- Click the group icon under the Location label.
- Use the search icon (magnifying glass) to search for the camera’s location.
- Alternatively, zoom in and out with the mouse wheel and drag the map to find the location.
- Once you find the location, click on the map to place a pin with an "X" label.
- If needed, use the home icon to reset the map to its original view.
- You can also switch between 2D and 3D views or change the map type using the icons at the top.
- After selecting the location click the Set Location button to save location information.
- Click Save to confirm.
Following these steps will add your camera to the list on the left, making it available for use with your AI models.
Connecting on Client
Cordatus Client seamlessly identifies CSI, USB, and GSML cameras automatically, eliminating the need for manual addition by the user.
Connecting an IP Camera
You can integrate and utilize IP cameras within Cordatus, supporting both HTTP/HTTPS and RTSP streams.
HTTP URLs should follow the format "http://[IP_ADDRESS]/[STREAM_PATH]", while RTSP URLs should adhere to "rtsp://[USER]:[PASSWORD]@[IP_ADDRESS]:[PORT]/h264".
You can add IP cameras to your Cordatus account using either the Cordatus Web App or Cordatus Client.
It's important to know that IP cameras added through the Cordatus Web App can only be managed from the web interface. They cannot be controlled from the Cordatus Client. If you want to manage these cameras in the Cordatus Client, you need to add them directly using the Cordatus Client.
Connecting on Web App
- Open Cordatus Web App and go to the Cameras page.
- Click the + button at the top to open a modal for adding a new camera.
- Choose Camera Type as IP.
- Enter your Camera Source URL.
- You can either attach your IP camera to a specific device or use it independently:
- To attach it to a device, select Device in the Attach to field and choose the desired device.
- If you don’t want to attach it to a specific device, select Public in the Attach to field.
infoThe option to attach IP cameras to devices is still under development and will be available soon.
- Enter a name for your camera in the Camera Label field.
- To add location information and view your camera on the map (accessible through the map icon in the left menu), follow these steps:
- Check the box next to Add Location.
- Use the search icon (magnifying glass) to search for the camera’s location.
- Alternatively, zoom in and out with the mouse wheel and drag the map to find the location.
- Once you find the location, click on the map to place a pin with an "X" label.
- If needed, use the home icon to reset the map to its original view.
- You can also switch between 2D and 3D views or change the map type using the icons at the top.
- Click Save to confirm.
Following these steps will add your camera to the list on the left, making it ready to use with your AI models.
Connecting on Client
- Launch Cordatus Client and access the Cameras page.
- Select the Add IP Camera button, prompting the appearance of a new camera modal.
- Enter your Camera Source URL in the IP Camera URL field.
- Provide a name for your camera in the Label field.
- Confirm the addition by clicking the Save IP Camera button.
Be careful when connecting an IP camera. Only use URLs from trusted and stable sources. Using unreliable or untrustworthy URLs may cause connection problems, instability, or security risks. Verify the source and reliability of the URL before adding it to Cordatus for a safe and stable connection.
Streaming a Connected Camera
When a camera stream is opened, Cordatus Stream Engine establishes a connection with the camera and begins displaying the stream. If the connection cannot be established or is lost during streaming, Cordatus attempts to reconnect to the camera. The initial reconnection attempt is made after 5 seconds, followed by subsequent attempts after 10 seconds and then 20 seconds. These intervals continue to increase until reaching 600 seconds by multiplying the current interval by 2. After reaching this maximum interval, Cordatus attempts to reconnect to the camera every 10 minutes.
You have the ability to view all raw camera streams using both Cordatus Client and Cordatus Web App.
Streaming on Web App
- Navigate to the Cameras page. The cameras you add will be displayed on Cameras Tab.
- Click on that camera from which you want to display stream.
- On the modal titled Select a target device that appears, choose the device where you want the incoming stream to be decoded.
- Click the Select button to view your stream.
Viewing Information about Your Stream
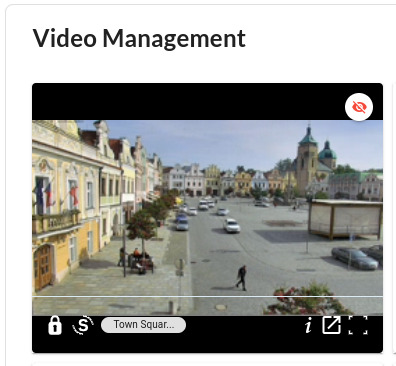
To access additional stream details, simply hover over the stream window to reveal the bottom bar. Here's what each icon on the bar represents, from left to right:
- Lock Icon: Locks and unlocks the bar on the window.
- "S" or "I" Letter: Labels the stream as either streaming or inferencing video.
- Camera Name: Displays the name of the camera with a white background.
- "i" Icon: Provides more information about your stream, including camera and connection type, stream duration, and downloaded stream data.
- Stream Details Icon: Expands the view to show more detailed information.
- Fullscreen Icon: Enlarges the stream to fullscreen mode for better viewing.
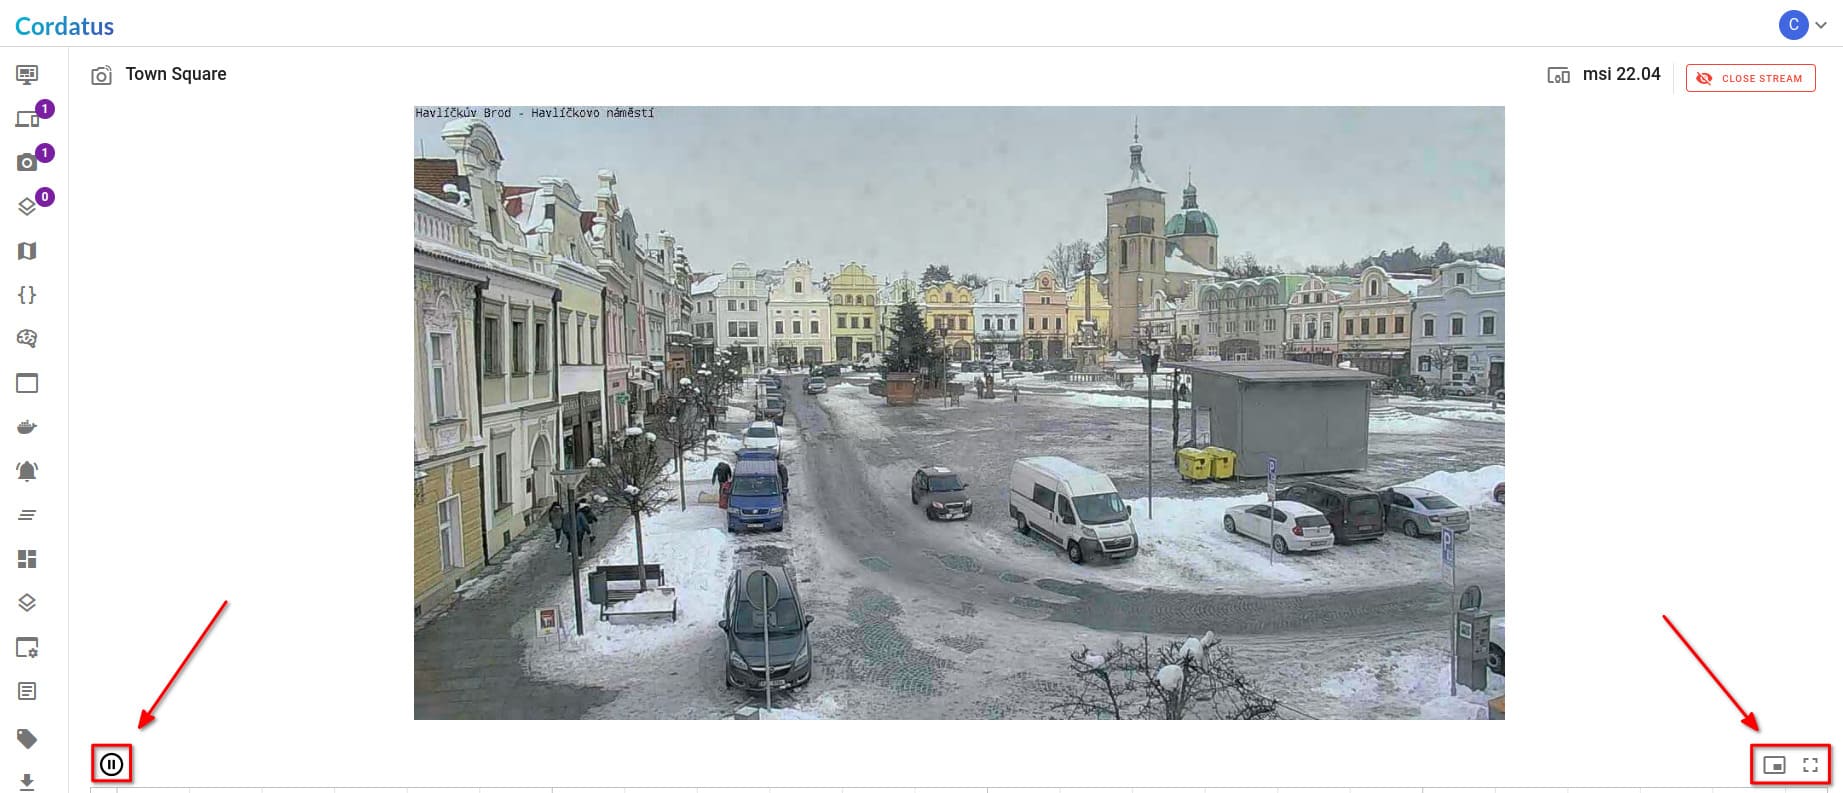
In the expanded view, you can use the icons displayed in the image below to stop or start the stream, view it in Picture-in-Picture mode, or expand it to full size.
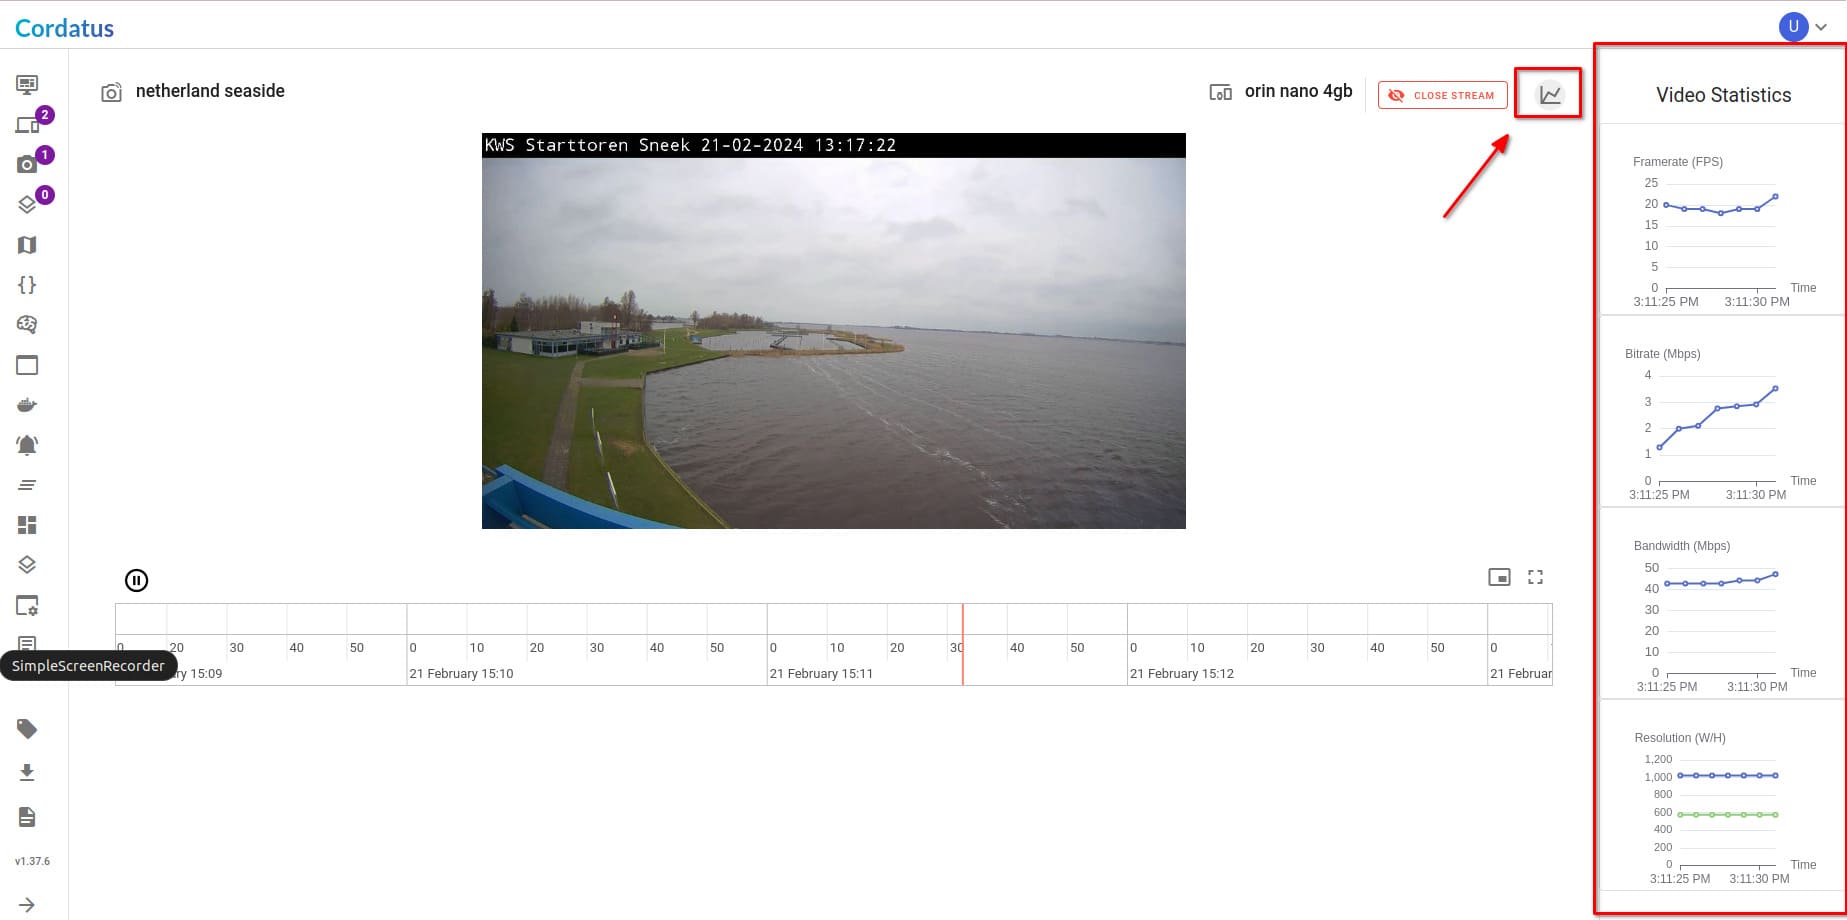
You can see more details about your stream by clicking the graph icon in the top right corner of the screen. A panel will appear where you can check the frame rate (FPS), bitrate, bandwidth, and resolution of your stream.
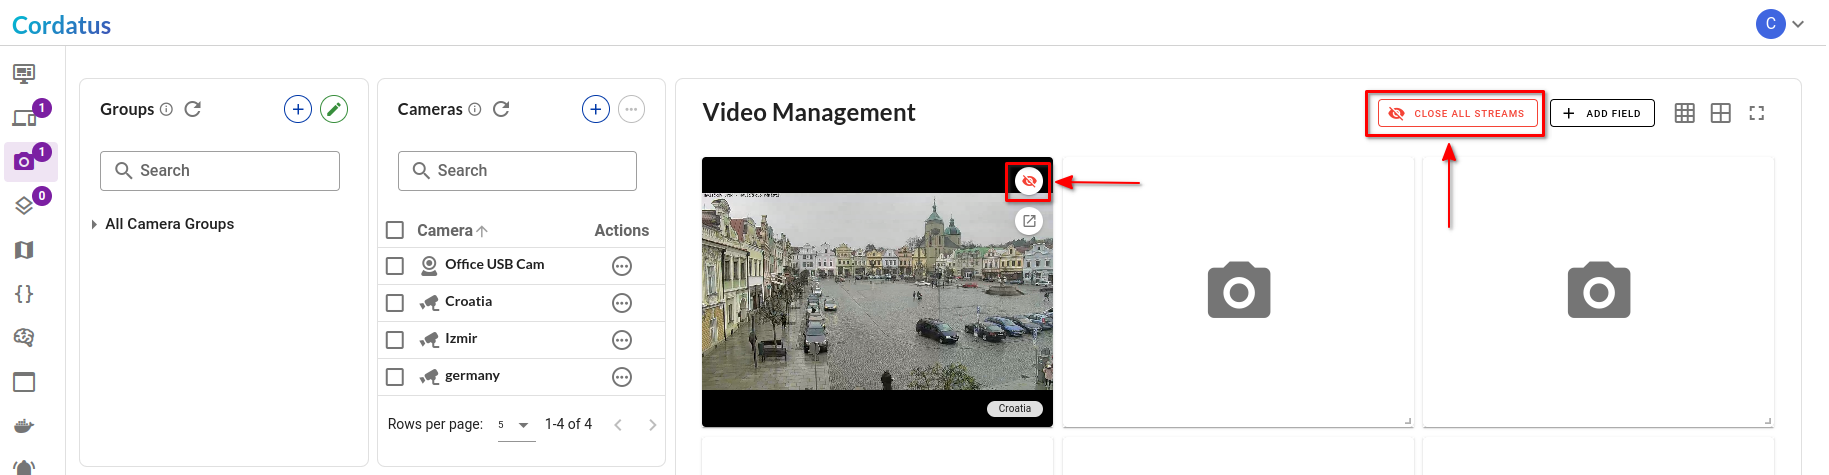
Closing the Stream
To close a stream, click on the red Close Stream icon at the top right of the respective stream. For closing multiple streams simultaneously, use the red Close All Streams icon at the top right corner of the page.
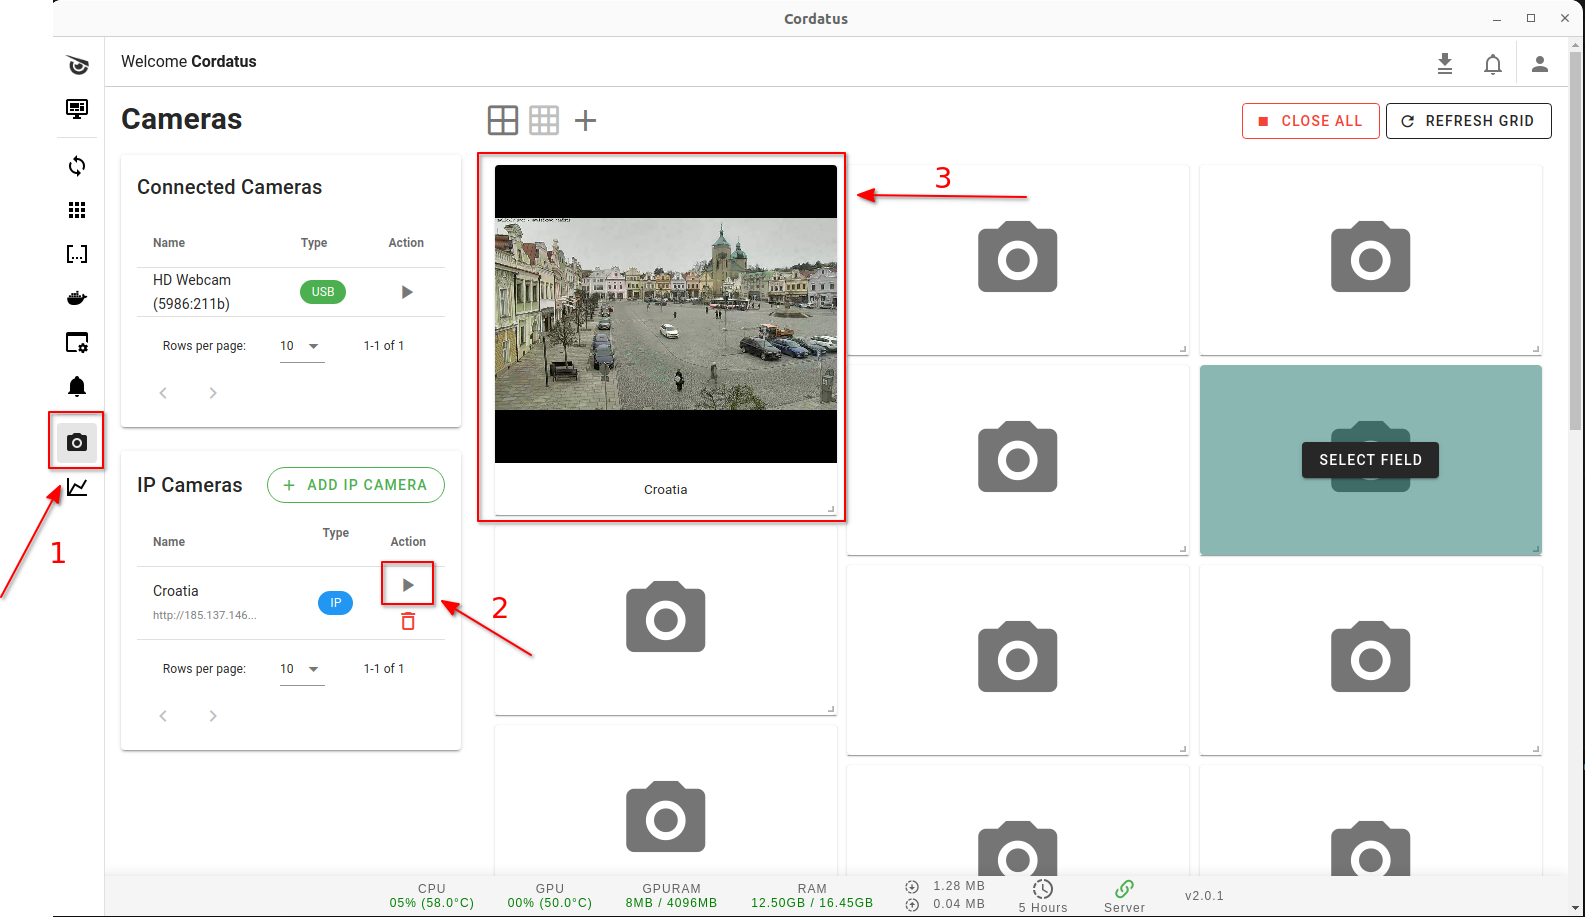
Streaming on Client
- Launch Cordatus Client and access the Cameras page.
- Click the Play button next to the camera you wish to view.
- The stream will commence and appear on the right side of the client.
Closing the Stream
To close a stream, click on the red Close Stream icon at the top right of the respective stream. For closing multiple streams simultaneously, use the red Close All icon at the top right corner of the page.

Managing Cameras
Grouping Cameras
Grouping in camera management provides the ability to organize and categorize cameras based on common characteristics or functions, streamlining administrative tasks. This feature is especially beneficial for organizations managing a large number of cameras, enabling them to maintain control and oversight with greater ease.
Creating Groups and Subgroups
You can create groups or subgroups and assign your cameras to these categories for simplified management by following the steps below:
- Click the blue plus icon located in the upper right corner of the Groups window to open the New Group Modal.
- Enter the desired name for your new group.
- If needed, provide a description for your group.
- If this group is intended to be a subgroup within a parent group, please select the relevant parent group accordingly.
- Lastly, you can add tags to your group to provide descriptions and facilitate the easy management of your newly created group.
- Click Save button to create your group.
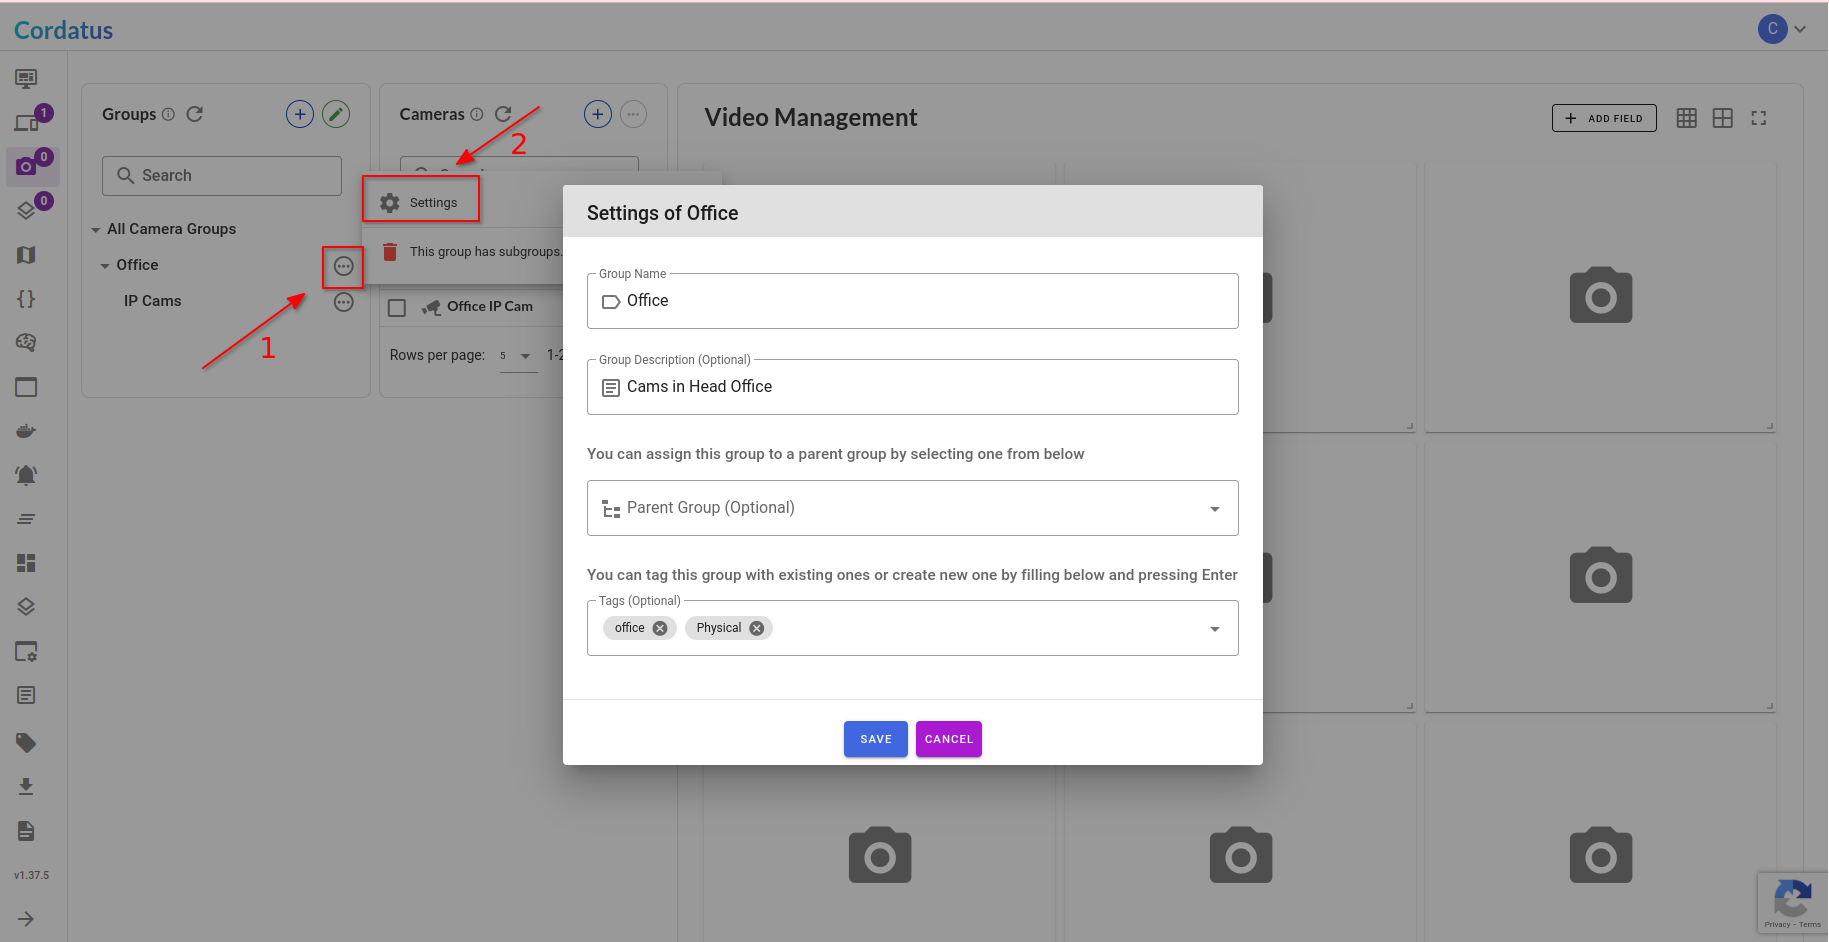
Editing Groups
To make edits to existing groups, you can easily do so by clicking the ellipsis icon next to the group and selecting the Settings button. In the subsequent window that opens, you will have the option to modify the name, description, parent group, and tags of the group.
Assigning Cameras to Groups and Subgroups
To assign your cameras to groups with ease, follow the steps below:
- Click the green pencil icon situated in the upper right corner of the "Groups" window to access the Editing Groups page.
- If you need to reorder your groups, simply drag and drop the group you wish to edit within the Group Hierarchy window and then click the Save List button.
- Select the group to which you want to add cameras.
- Drag the cameras from the Cameras window on the right and drop them into the middle window with the group's name.
- To remove a camera from a group, drag the camera from the middle window, which displays the group's name, and drop it back into the Cameras window on the right.
- After completing the grouping, click the Save Group button at the bottom.
- If you wish to add cameras to other groups, repeat steps 3-6.
- Once you've finished the grouping, click the Back to Cameras button at the top left to return to the Cameras page.
- Click on the group name listed in the Groups window to view the cameras that belong to that group.
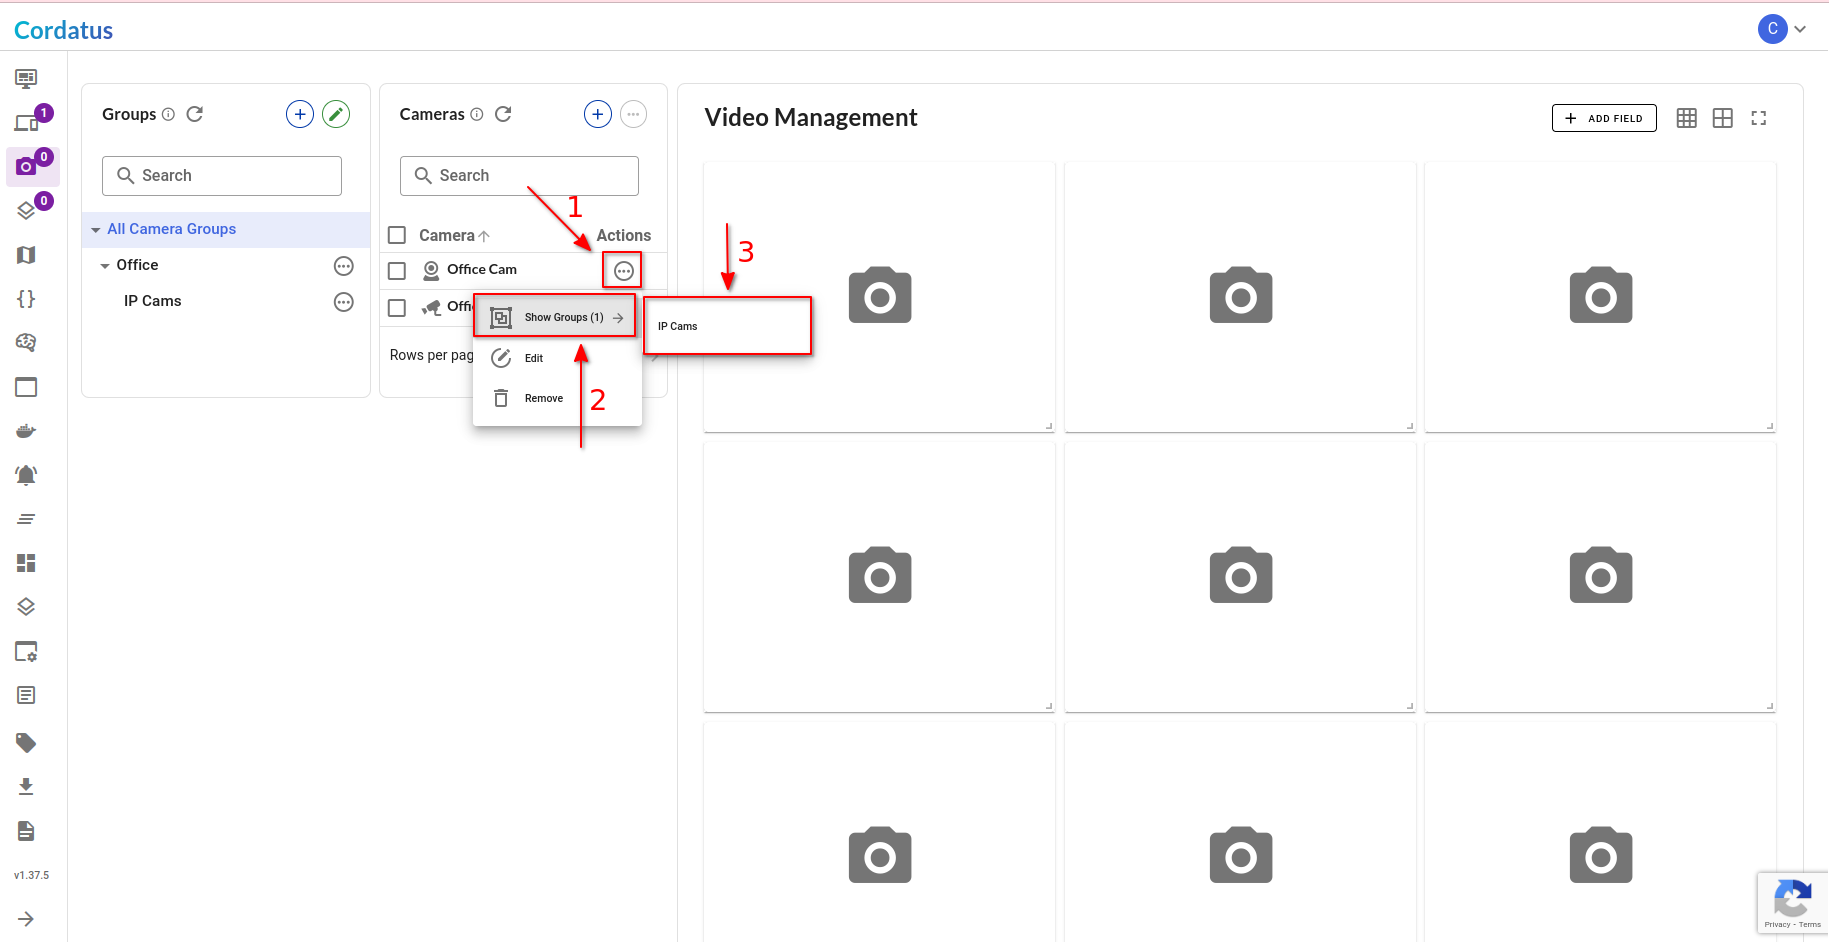
To view the assigned groups of a camera, click the ellipsis icon below the Actions column. Then, select the Show Groups button in the menu that appears. This button will display the groups to which the camera is assigned.
Deleting Groups and Subgroups
To delete a group, simply click the ellipsis icon next to the group and select the Delete Group button.
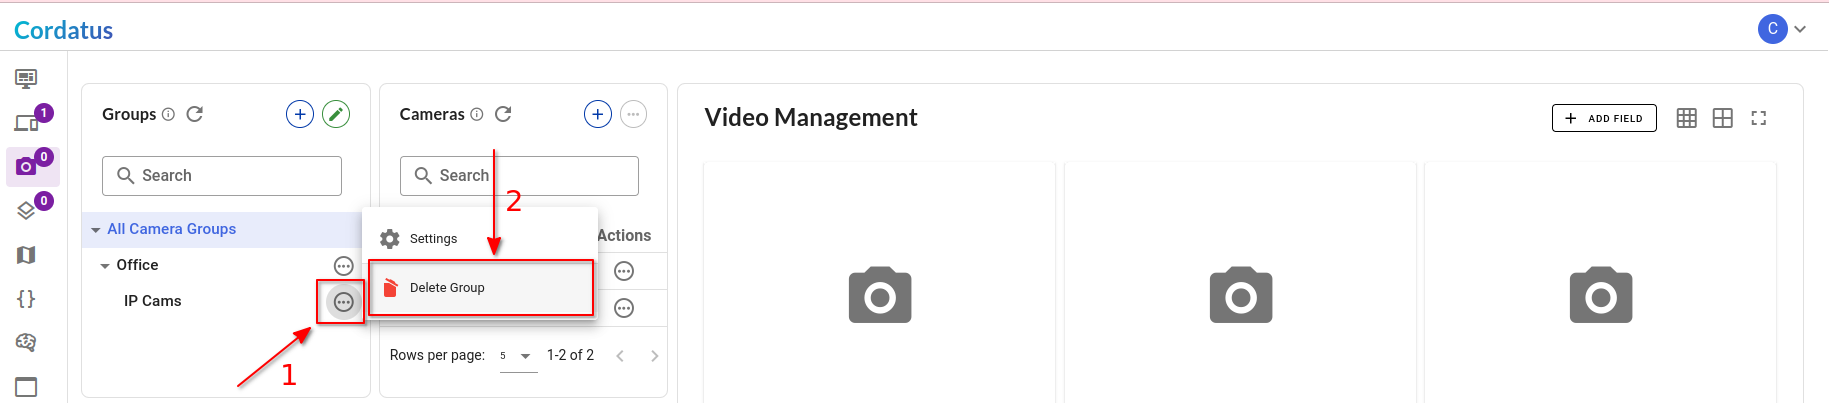
If a group contains subgroups, it's important to note that you must delete the subgroups first before you can proceed to delete the parent group.
Renaming a Camera
- Click the ellipsis icon located next to the camera name.
- Click on Edit in the displayed menu.
- In the Edit Camera Modal, modify the name in the Camera Label field.
- For IP Cameras, you can also edit the camera's URL.
- After making the desired changes, click the Save Changes button to update the camera's name.

This option is only available in the Web App.
Removing Cameras
On Web App
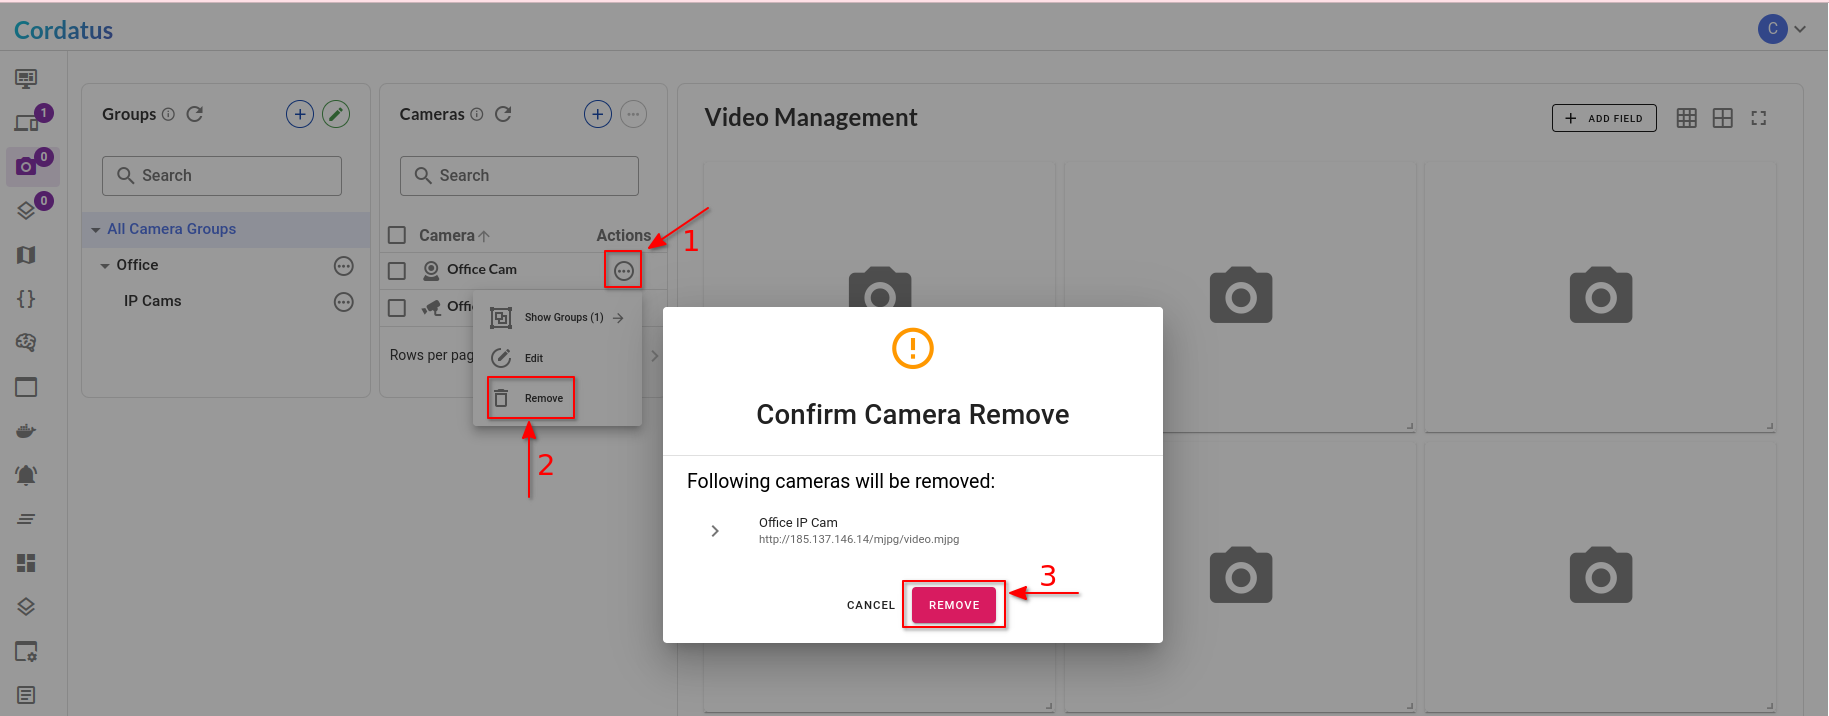
- To remove a single camera;
- Click the ellipsis icon located next to the camera name you wish to remove.
- Click on Remove in the displayed menu.
- In the Confirm Camera Romve Modal, click the Remove button.
- To remove multiple cameras;
- Check the boxes next to the cameras you want to remove.
- Click the ellipsis icon located at the top right of the tab.
- Click on Remove Selected Cameras in the displayed menu.
- In the Confirm Camera Romve Modal, click the Remove button.
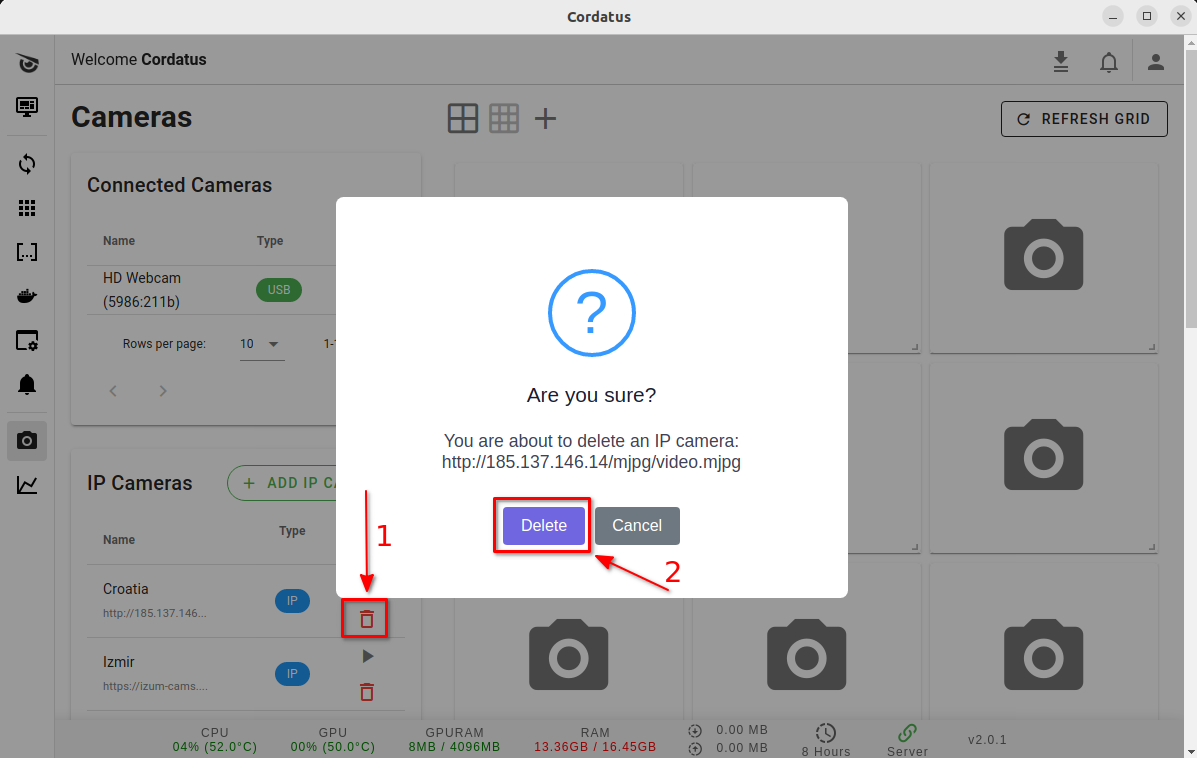
On Client
To delete a camera on the Client, click on the trash icon under the Actions Column, and then select Delete on the modal that appears.
Removing multiple cameras simultaneously is currently not available in the Client.
Manipulating the Video Management Tab
On Web App
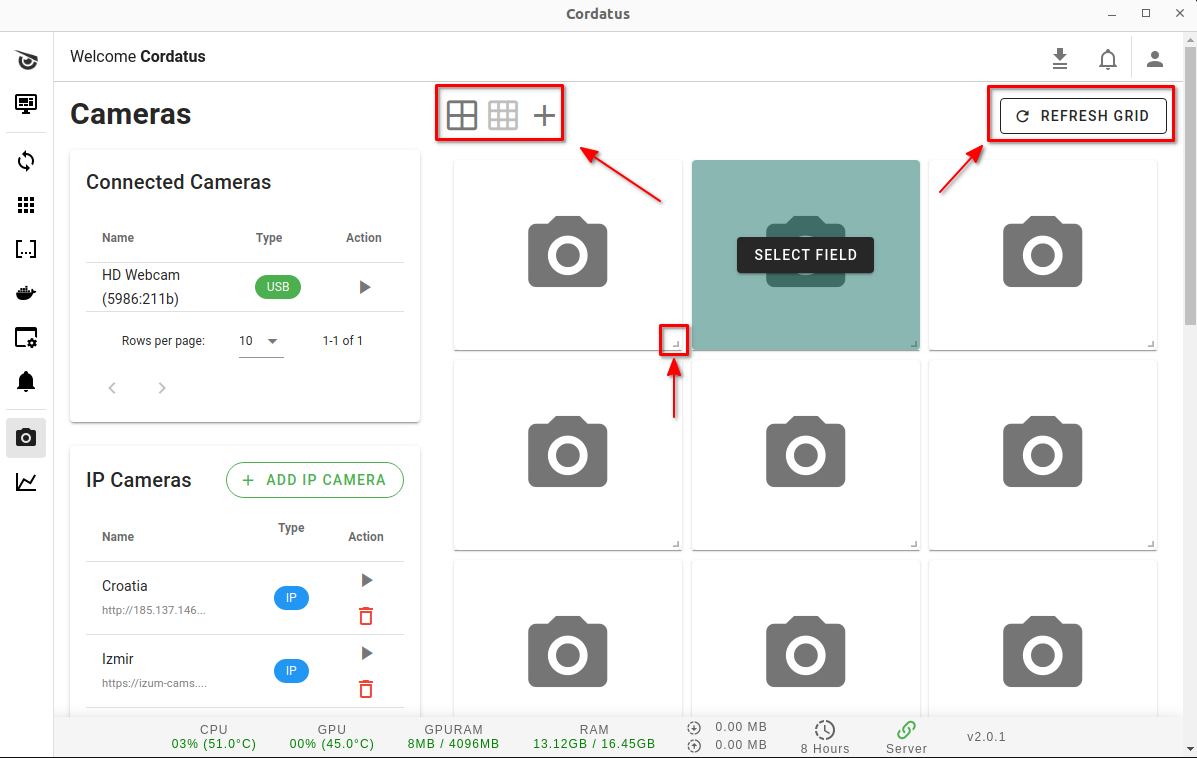
The Video Management tab on the Cameras page provides several features to enhance your stream viewing experience:
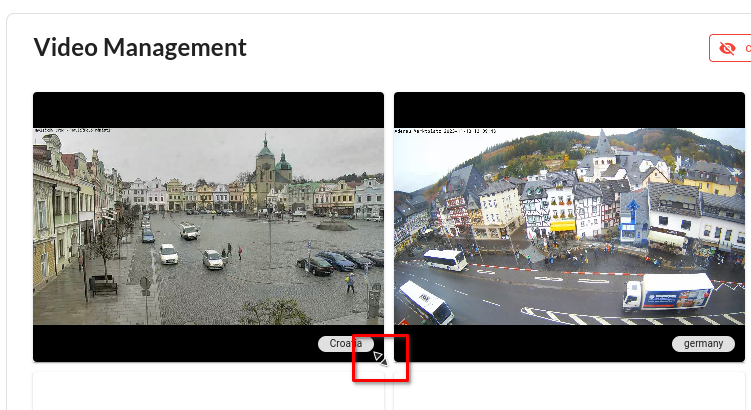
- Drag and drop streams to rearrange their order.
- Utilize the arrow on the bottom right corner of each frame to adjust the stream size.
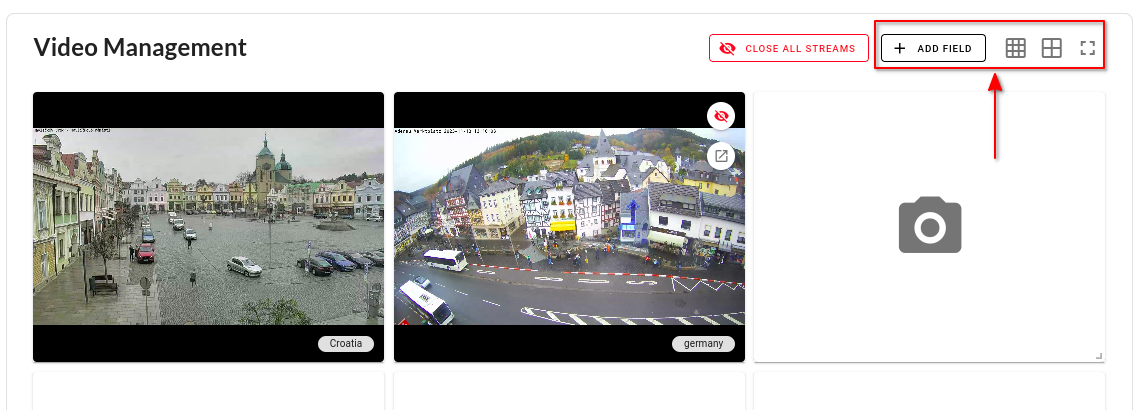
- If the available fields on the tab are insufficient for all streams, add a new field using the Add Field icon at the top right. You can also resize, stretch, or make the tab full screen using the icons next to the Add Field icon.
On Client
On the client, you can utilize similar features with slight changes on the interface.
Customizing Video Quality for Physical Cameras
For USB and CSI camera streams, you can customize the stream quality by following these steps:
- Click on the ellipsis icon under the actions column in the row of the desired camera.
- From the menu that opens up, select Set Camera Settings.
- Choose the desired resolution from the available options and click Apply.
Once the resolution is set, the settings will be stored and the camera will start with the selected settings until it is changed again.
Additionally, you can customize the stream quality during the streaming process by following these steps:
- Click on the Stream Settings icon located on the bottom right of the stream.
- In the modal that appears, choose the desired resolution setting from the dropdown menu for your camera.
- Click Apply to implement your chosen settings.
Your selected settings will be stored and applied to your camera for future uses.
You can also adjust the resolution of USB and CSI cameras on the client by following the same steps on the Cameras page of the client.

Adding a New Drive
Cordatus enables users to record their camera streams easily. This section explains how to integrate and set up storage drives specifically for recording camera feeds. By efficiently adding and configuring drives, users can guarantee a reliable and effective recording setup, improving Cordatus's overall performance.
Adding a New Drive via Ubuntu GUI
Below are the steps users can follow to seamlessly integrate a new drive into their system using the Ubuntu graphical user interface (GUI):
- Ensure your drive is physically connected to your computer.
- Click the Show Applications icon at the bottom left of the screen and select the Disks application. Alternatively, you can open a terminal, type
gnome-disks, and press enter to open the application. - In the application, select your disk from the list under the Disks column.
- Click on the play icon located under the bar representing your drive. If the icon is a stop icon, it means your drive is already mounted.
- You can find the path of your mounted drive in the Contents section after the text Mounted at.
Making the Drive Permanent
To ensure your drive is mounted at every reboot on the specified point, follow these steps:
- In the Disks application, select your disk from the list under the Disks column.
- Click on the gear icon located under the bar representing your drive, and then click on Edit Mount Options.
- Disable the User Sessions Defaults setting if it's enabled.
- Ensure that Mount at system startup is selected.
- Optionally, check the Show in user interface box if you want your drive to be visible in the Files application sidebar.
- Enter a mount point for your drive.
- Click OK to confirm the changes.
Adding a New Drive via Command Line (CLI)
Below are the steps users can follow to seamlessly integrate a new drive into their system using the Command Line Interface (CLI):
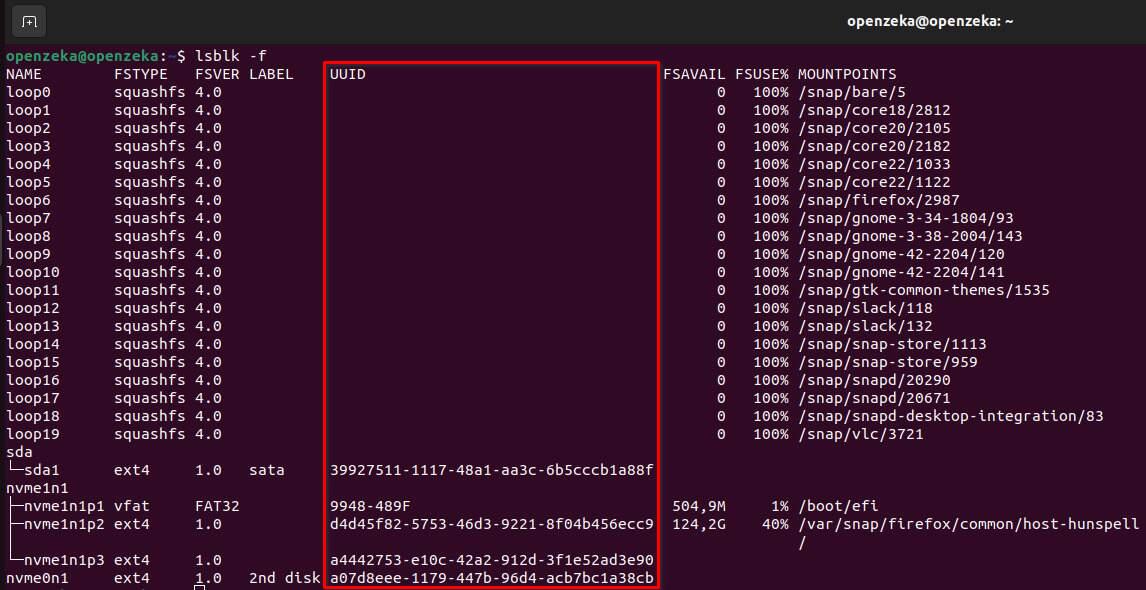
- First, determine the device UUID by using the command below. Execute the command and note the device UUID for your new drive:
lsblk -f
- Next, create a folder to serve as the mount point for your drive. Use the following sample command to create a folder named "backups" under the "mnt" folder:
mkdir /mnt/backups
- Finally, mount your device to the folder you created using the device name obtained in the previous step:
mount /dev/<device name> /mnt/backups
Making the Drive Permanent
To configure your drive to mount at startup, you'll need to modify the /etc/fstab file. This file contains entries for each device to be mounted automatically at boot time. Follow the steps below to mount your drive:
- Open the
/etc/fstabfile using a text editor application. For example, you can use thenanoapplication by running the command:
nano /etc/fstab
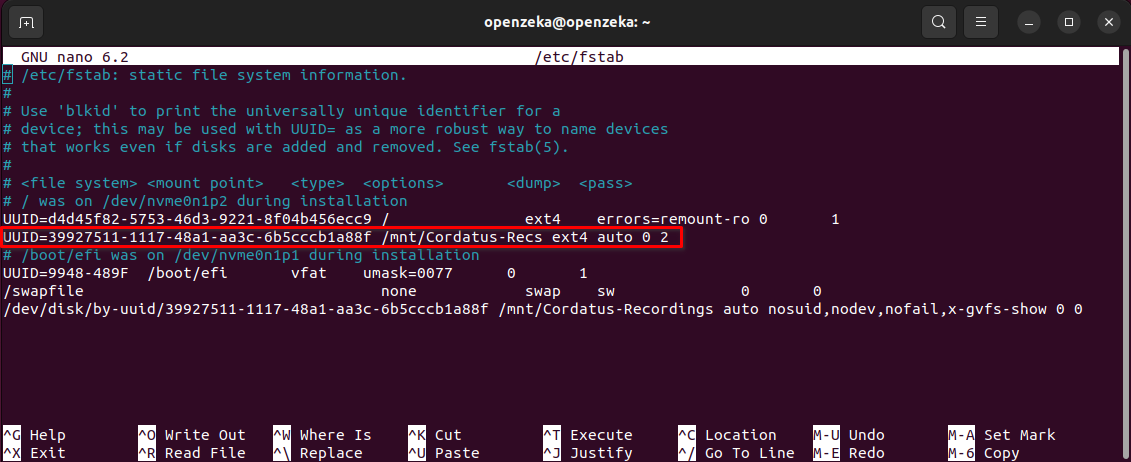
- Inside the
/etc/fstabfile, each device to be mounted at startup has its own entry. Add a new line for your drive, including six pieces of information separated by white space:
- Device ID (UUID): Obtain the UUID of your device using the
lsblk -fcommand, as explained in the previous section. - Mount Point: Specify the point where you want your device to be mounted.
- Type: Specify the file system type of your drive.
- Options: Customize your mount process. Use "auto" to mount your drive automatically at startup.
- Dump Option: Set whether the backup utility dump will back up the file system. Use "0" to ignore the file system or "1" to back up the file system. If in doubt use 0.
- File System Check (Fsck) Order: Specify the order for fsck to check the file systems. Use "1" for your root partition and "2" for the rest. Use "0" to disable file system checking at boot or for network shares.
A sample entry will look like:
- Save the changes and exit the text editor.
After adding this line to the /etc/fstab file, your device will be mounted at the specified mount point automatically each time the system starts up.
Troubleshooting
Encountering issues while adding a new drive via Ubuntu GUI or Command Line Interface (CLI)? Below are some common problems and their solutions:
Drive Not Detected
- Ensure that the drive is physically connected to your computer.
- Check if the drive is compatible with your system.
Unable to Mount Drive
- Verify that the drive is not already mounted. If it is, unmount it before attempting to mount again.
- Check the permissions and ownership of the mount point directory.
- Ensure that the file system type of the drive is supported by your system.
Drive Mounting Unsuccessful at Startup
- Double-check the entry added in the /etc/fstab file for any errors.
- Ensure that the UUID of the device and the mount point specified are correct.
- Check the file system type and options specified in the /etc/fstab file.