Devices
Adding a Client Device
Before you add a client device to the Cordatus platform, you must create a Cordatus account if you have not already done so. You can create a new account for free.
For Cordatus to establish a seamless connection with your device, Cordatus Client must be installed and actively running on your device.
After registering and activating your account, you can add a device to the Cordatus platform. Keep in mind that to fully use the platform's features, you need an active Cordatus account.
Adding a Device with User Credentials
- Launch Cordatus Client on your Ubuntu desktop or embedded device.
- Click the Login button and provide your Cordatus account details.
- After logging in, Cordatus Client will prompt you to assign a license to your device.
- Choose the suitable license and click Continue to move forward.
- Cordatus Client is now set up, enabling you to connect to it via the Cordatus Web App.
On this modal, you can track various metrics of your device, such as CPU, GPU, and board temperatures, RAM usage, SWAP rate, and GPU memory utilization. You can explore more details by selecting tabs for containers, storage information, device alarms, jobs, and sensors. You can also toggle whether to launch the Cordatus Client on startup of your device. Additionally, you can start and stop device metrics by using the Stop Jtop Service/ Stop Metrics button. Finally, you have the option to restart or shut down your device by clicking the respective icons in the upper right corner.
Adding a Device with Token
There are two methods for adding a device using a token: the Cordatus Client GUI or the headless terminal mode. However, before proceeding, it's necessary to generate a client token.
Generating A Single Token
- Log in to Cordatus Web App: Access the Cordatus Web App and log in with your Cordatus account credentials.
- Go to Devices Page: After logging in, navigate to the Devices page from the left-hand menu in the Cordatus Web App.
- Click New Device Button: Initiate the process by clicking the New Device button on the Devices page to add a new device to the Cordatus platform.
- Provide Name: Specify a name for your device.
- Select a License: Choose a suitable license. If you prefer to add your device without a license, just skip this step.
- Save the Device: After you enter the required information, click the Save button. If you prefer to add your device without a license, click the Save Device Without a License button at the bottom. Cordatus will then generate a token for your device.
Once you've successfully created a new device and obtained its associated token, make sure to securely store the token for future use with the Cordatus client.
If you lose the client token or need to generate it later, simply click the Generate Token button. You can find this button in the menu accessed through the ellipsis icon under the Actions title.
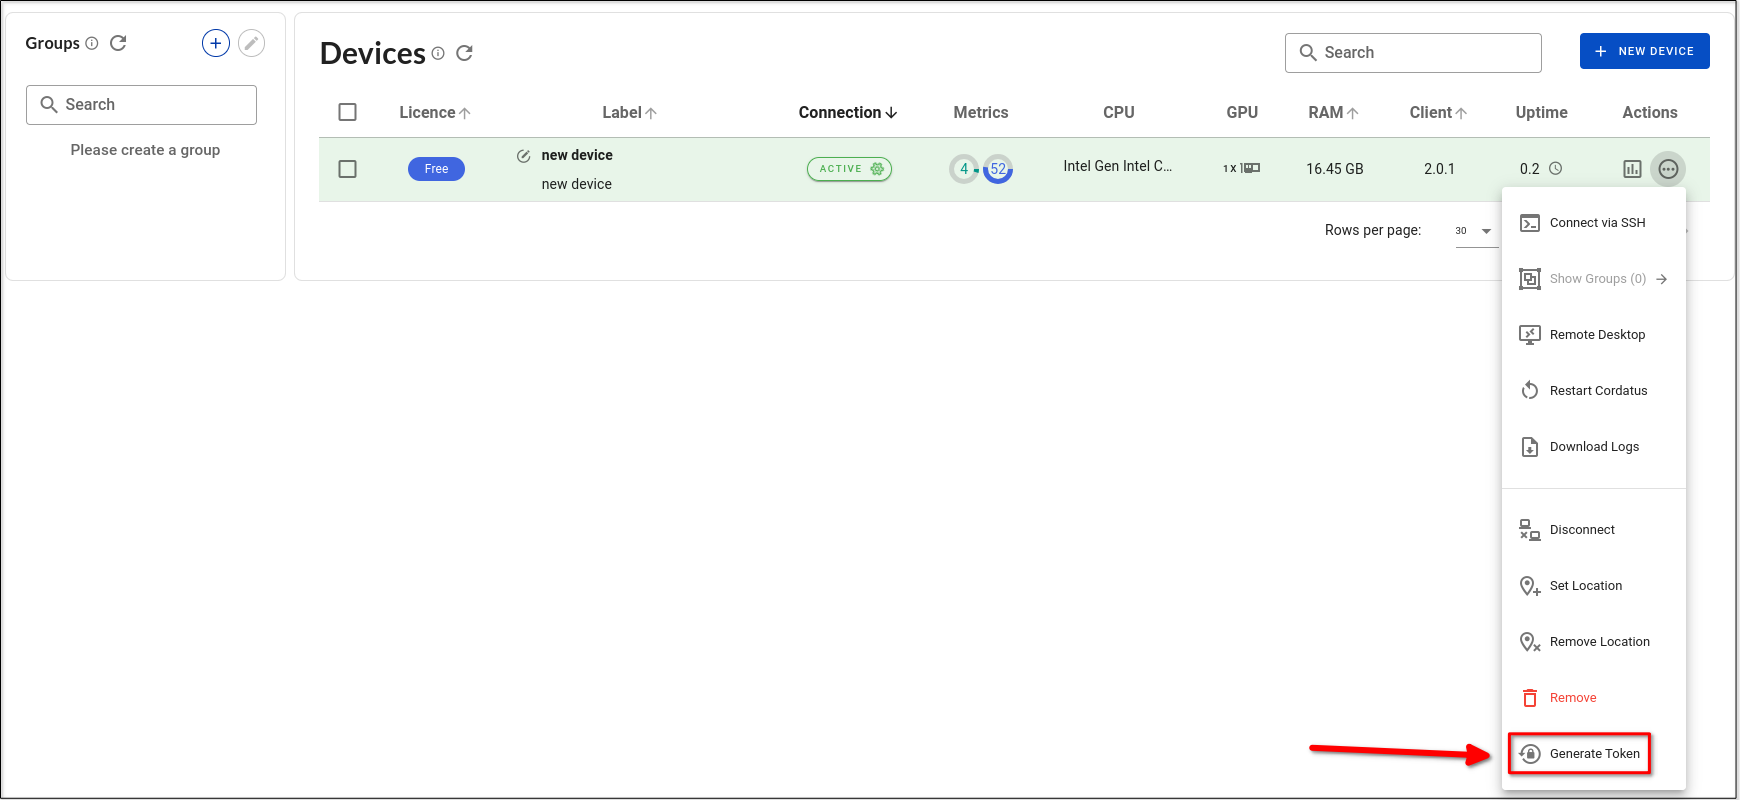
In the dialog box, you have two options:
- Use your existing token to add the selected device.
- Create a new token, which will delete the existing one, and use it to add your device.
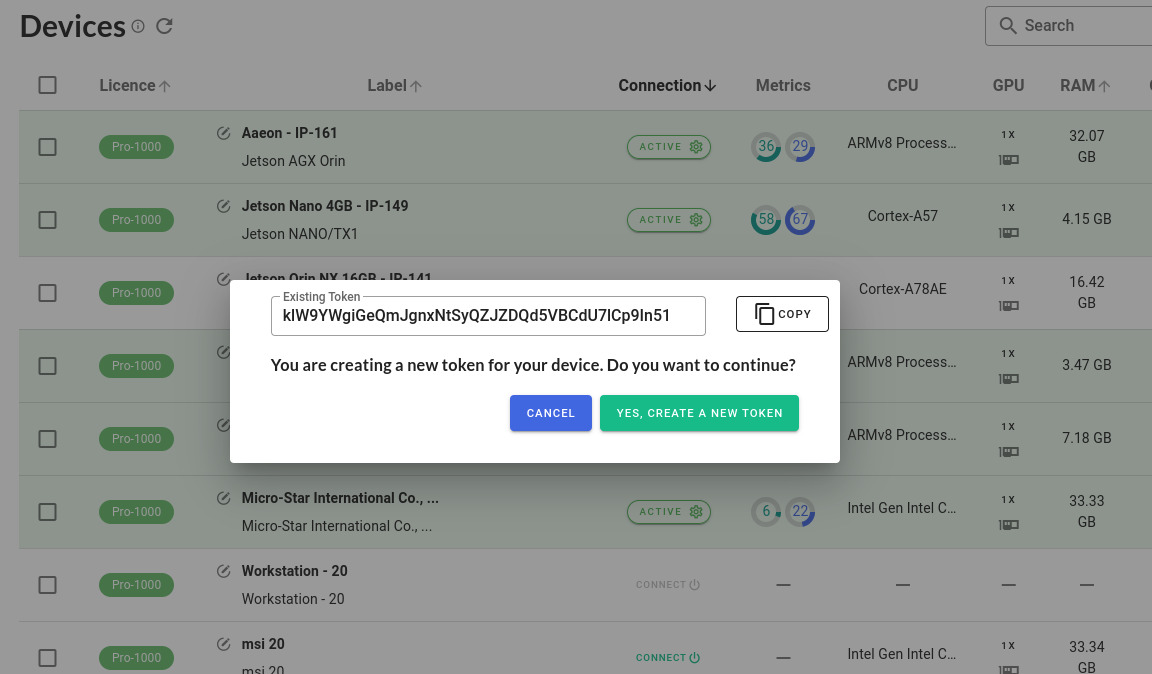
Generating a new token will deactivate the previous one, causing any device using the old token to be logged out.
Generating Multiple Tokens
To create multiple tokens to add multiple devices:
- Log in to Cordatus Web App: Access the Cordatus Web App and log in with your Cordatus account credentials.
- Go to Devices Page: After logging in, navigate to the Devices page from the left-hand menu in the Cordatus Web App.
- Click New Device Button: Initiate the process by clicking the New Device button on the Devices page to create multiple tokens.
- Choose Add Multiple Devices from the dialog that opens up.
- Provide Group Name and Select Licenses: From the Add Multiple Devices modal that opens up provide the following inputs:
- Label of the Devices: Give a group name for your devices.
- Quantity of the Devices: Provide the number of devices you want to add to Cordatus.
- If you want to get the list of the tokens in csv format check the related box above the license selection panel. If you do not wish to get the list of your tokens in this step, you can generate tokens later for each of your device as explained later in this section.
- Select the available licenses for your devices from the panel at the bottom of the modal. If you prefer to add your device without a license, just skip this step.
- Create Devices: After entering the necessary information, click Create Devices button. If you prefer to add your devices without license, click the Save Device Without a License button at the bottom. Cordatus will then generate and download the tokens and create devices in the platform.
- Along with creating devices, Cordatus will also create a group for your devices added in this step which you can access on the Groups panel on the left.
Once you've successfully created devices and obtained associated tokens, make sure to securely store the tokens for future use with the Cordatus clients.
Adding a Device from Cordatus GUI
- Run Cordatus Client: Start the Cordatus client on your device.
- Click Login Button: In the Cordatus client window, click the Login button to connect to the Cordatus platform.
- Open Token Tab: Inside the Cordatus client login window, go to the Token tab.
- Enter Your Token: Paste the token generated by Cordatus into the designated field. If right-click doesn't work, use the ctrl+v combination.
- Click Login Button: After entering the token, click Login to connect your device with the Cordatus platform.
Once the connection is successful, Cordatus will configure your device and assign the associated license.
Adding a Device from the Terminal with Headless Mode (Adding a Device to Servers)
If you don't need a graphical user interface for the Cordatus client, do not have Ubuntu Desktop or plan to run the Cordatus on a server, you can install and start Cordatus in headless mode. Make sure that the Client is installed on your device by following the steps on Install Cordatus Client
For Ubuntu Desktop Versions:
Run the following command in your client device's terminal, including your token with the --token parameter. If Ctrl+V doesn't work for pasting the command, right-click in the terminal and choose paste from the menu:
cordatus --server --token=<your_token>
Once the connection between your device and the Cordatus platform is successfully established, Cordatus will proceed to configure your device and allocate the associated license.
Cordatus requires sudo privileges for certain functions like device metric tracking. You can add sudo privileges and securely store your sudo password using the following parameters with the provided commands when adding your device:
cordatus --server --token=<your_token> --sudoPass:<your_sudo_password> --saveSudoPass
If you don't enter your sudo password during device addition, you can input it later anytime when starting Cordatus in server mode using the same parameters.
After adding your device, you can start Cordatus by just entering the command below after each reboot:
cordatus --server
For Ubuntu Servers:
For server versions, Cordatus is installed and runs as a service. After installing the client on your system and restarting, if you have chosen to start the Cordatus on start up during installation process, Cordatus will be running in the background. First, you need to stop the running Cordatus service to run the login command with your token:
sudo systemctl stop cordatus
After stopping the service, run the following command in your client device's terminal with the --token parameter to add your device to the Cordatus platform:
cordatus --server --token=<your_token> --sudoPass:<your_sudo_password> --saveSudoPass
Once the connection between your device and the Cordatus platform is successfully established, Cordatus will proceed to configure your device and allocate the associated license.
Cordatus requires sudo privileges for certain functions like device metric tracking. You can add sudo privileges and securely store your sudo password using the --sudoPass and --saveSudoPass parameters while adding your device. If you don't enter your sudo password during this step, you can enter it later anytime by using the same parameters.
You can check, stop, or start the Cordatus service by using the command below:
sudo systemctl status <stop or start> cordatus
Managing Devices
On the Devices page, you can easily view a list of all your devices and manage them. You can access various properties of your devices, such as license type, name, connection status, performance metrics (CPU and RAM usage), CPU type, number of GPUs, total RAM, Client version, and uptime duration.
Grouping Devices
Device grouping in management allows you to organize and categorize devices based on shared characteristics or functions, making administrative tasks more efficient. This feature is particularly useful for organizations handling a large number of devices, providing better control and oversight.
Creating Groups and Subgroups
To simplify device management, you can create groups or subgroups and assign devices to these categories by following these steps:
- Click the blue plus icon in the upper right corner of the Groups window to open the New Group Modal.
- Enter the desired name for your new group.
- Optionally, provide a description for your group.
- If this group is intended as a subgroup within a parent group, select the relevant parent group.
- Add tags to your group for descriptions and easy management.
- Click the Save button to create your group.
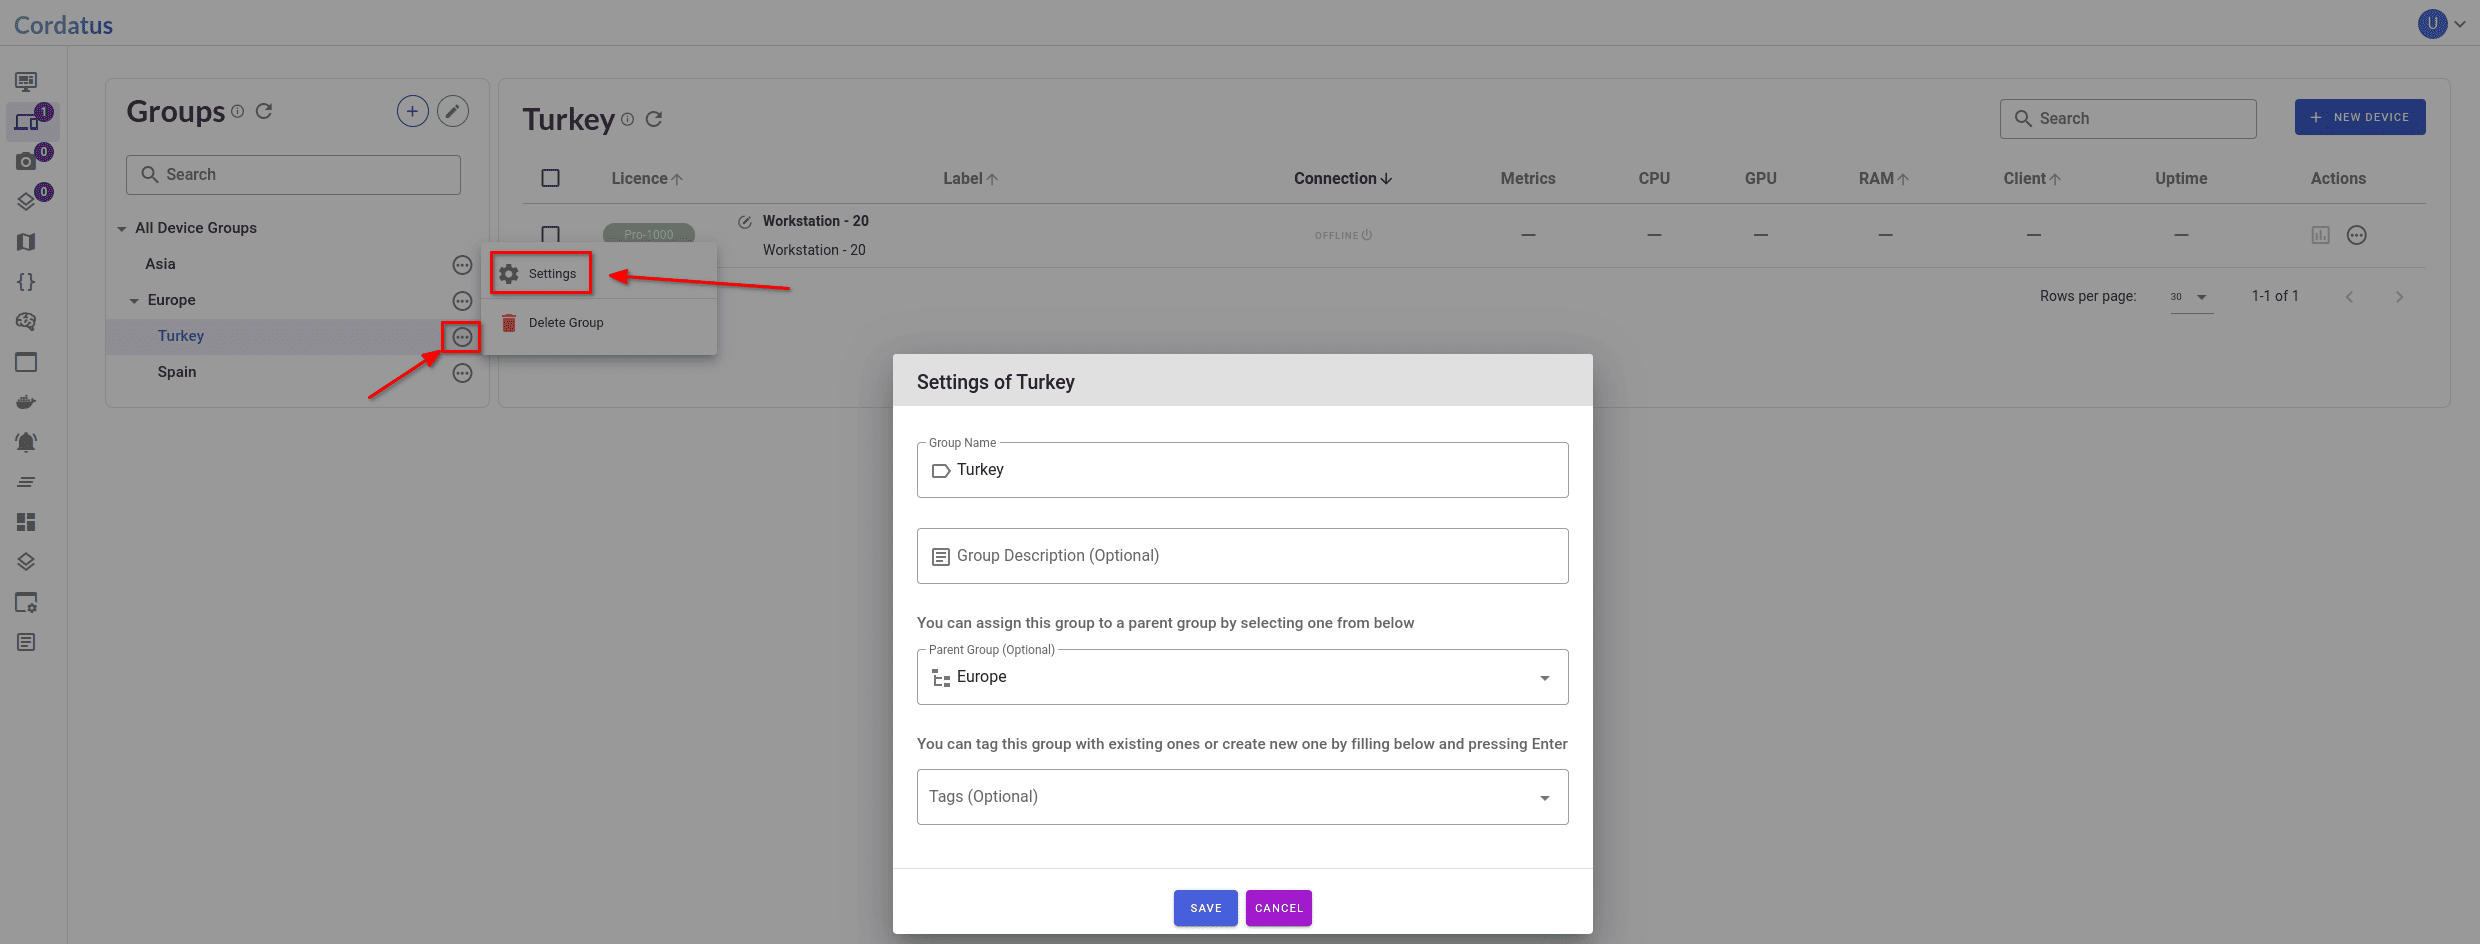
Editing Groups
To edit existing groups, click the ellipsis icon next to the group and select the Settings button. In the window that opens, you can modify the name, description, parent group, and tags of the group.
Assigning Devices to Groups and Subgroups,
To easily assign your devices to groups, follow these steps:
- Click the green pencil icon in the upper right corner of the Groups window to access the Editing Groups page.
- For group reordering, drag and drop the desired group within the Group Hierarchy window and then click Save List.
- Select the group to which you want to add devices.
- Drag devices from the Devices window on the right and drop them into the middle window with the group's name.
- To remove a device from a group, drag the device from the middle window back into the Devices window on the right.
- After grouping, click the Save Group button at the bottom.
- For additional groups, repeat steps 3-6.
- Once done, click Back to Devices at the top left to return to the Devices page.
- Click the group name in the Groups window to view devices belonging to that group.
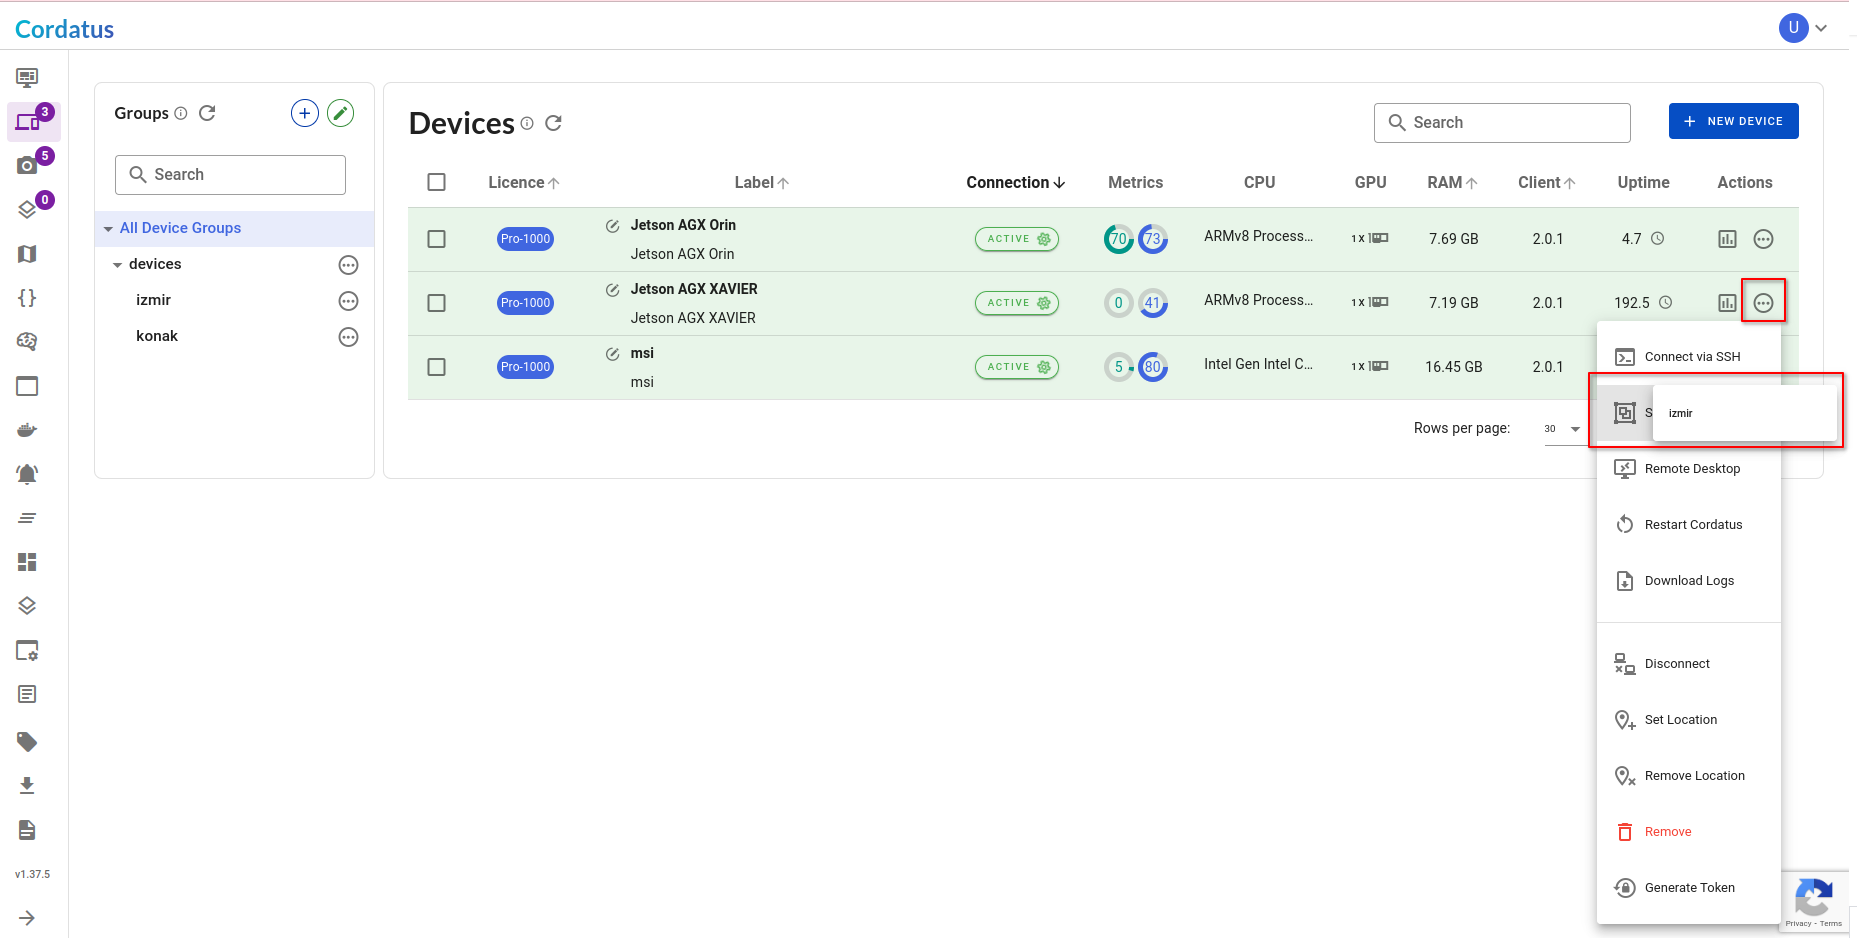
To check the assigned groups of a device, click the ellipsis icon below the Actions column, next to the metrics icon. Then, choose the Show Groups option in the menu. This button will reveal the groups to which the device is assigned.
Deleting Groups and Subgroups
To delete a group, simply click the ellipsis icon next to the group and select the "Delete Group" button.

When deleting a group that contains subgroups, please be aware that you need to delete the subgroups first before proceeding to delete the parent group.
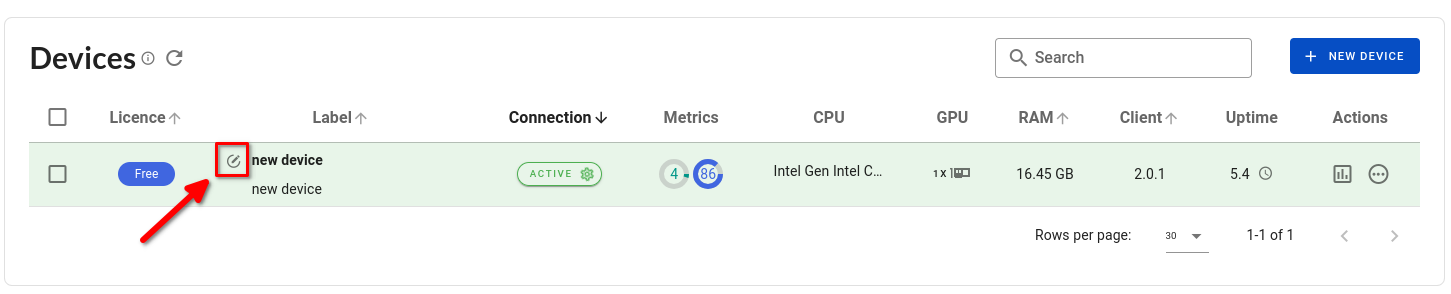
Renaming a Device
To change the device name, click the icon next to the device name, enter the new name in the field that appears, and then click the Save Changes button to update the device's name.
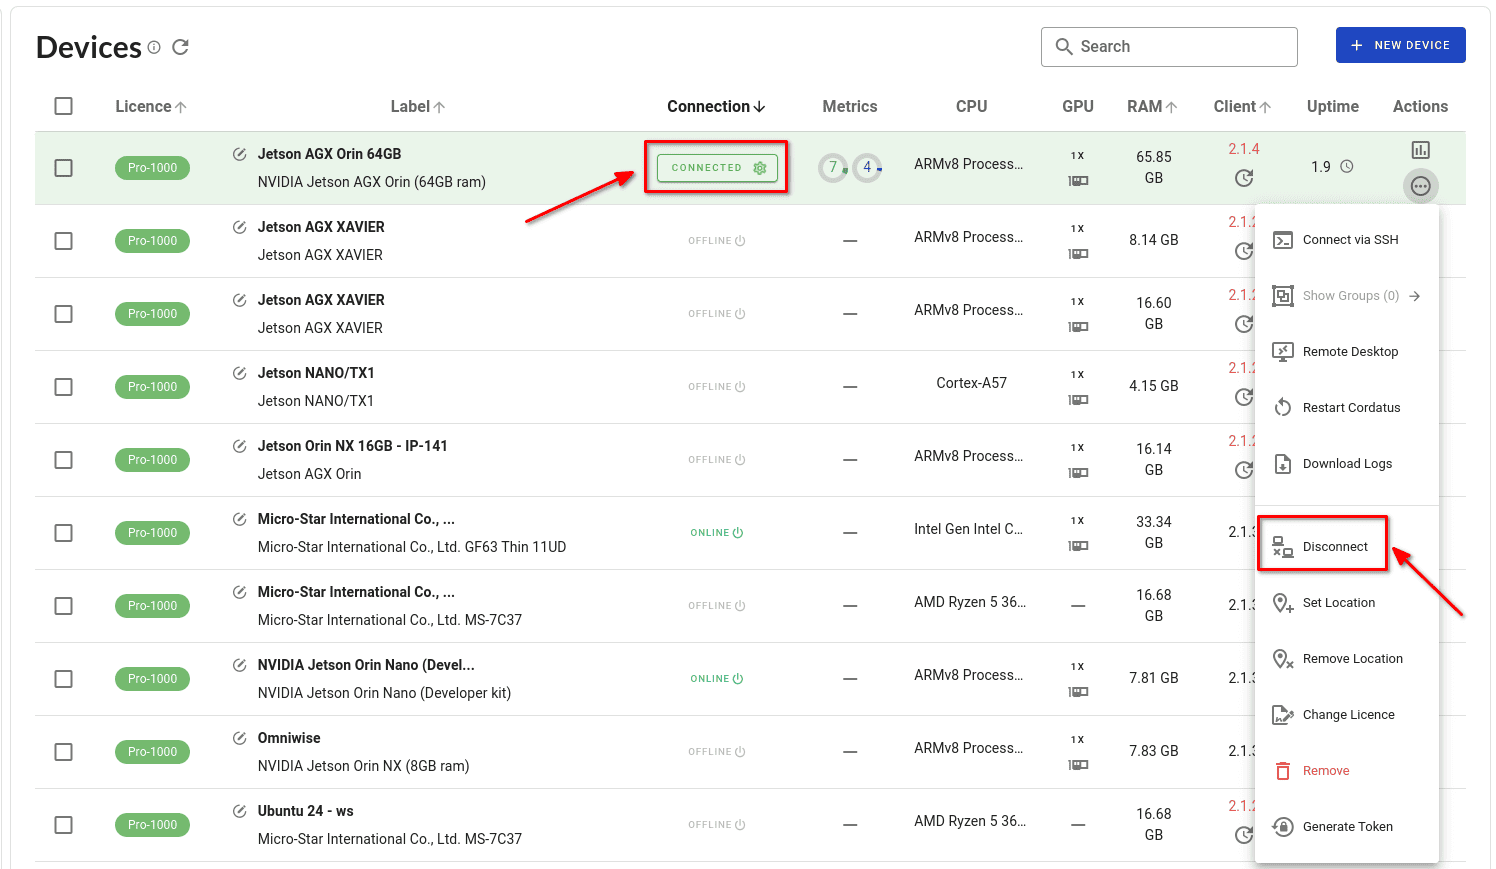
Disconnect and Reconnect a Device
In the Cordatus platform, devices are grouped into three categories: Offline, Online, and Connected. Offline devices are those that cannot be reached. Online devices have internet access and can be connected when needed, but remain disconnected to reduce resource usage. Connected devices are those that are currently connected and ready for operations.
When you log in to the Cordatus web page, the platform checks all devices added to Cordatus. It marks devices without internet access as Offline and the others as Online. Users can connect to an online device by clicking the Online button in the related device's row under the Connection column.

You can also connect multiple devices at once. First, select the devices by checking their checkboxes. Then, click the Connect Selected button at the top.

To disconnect a connected device, click the Disconnect button in the menu that appears when you click on the ellipsis icon beneath the Actions title, or simply click the Connected button in the related device's row under the Connection column.
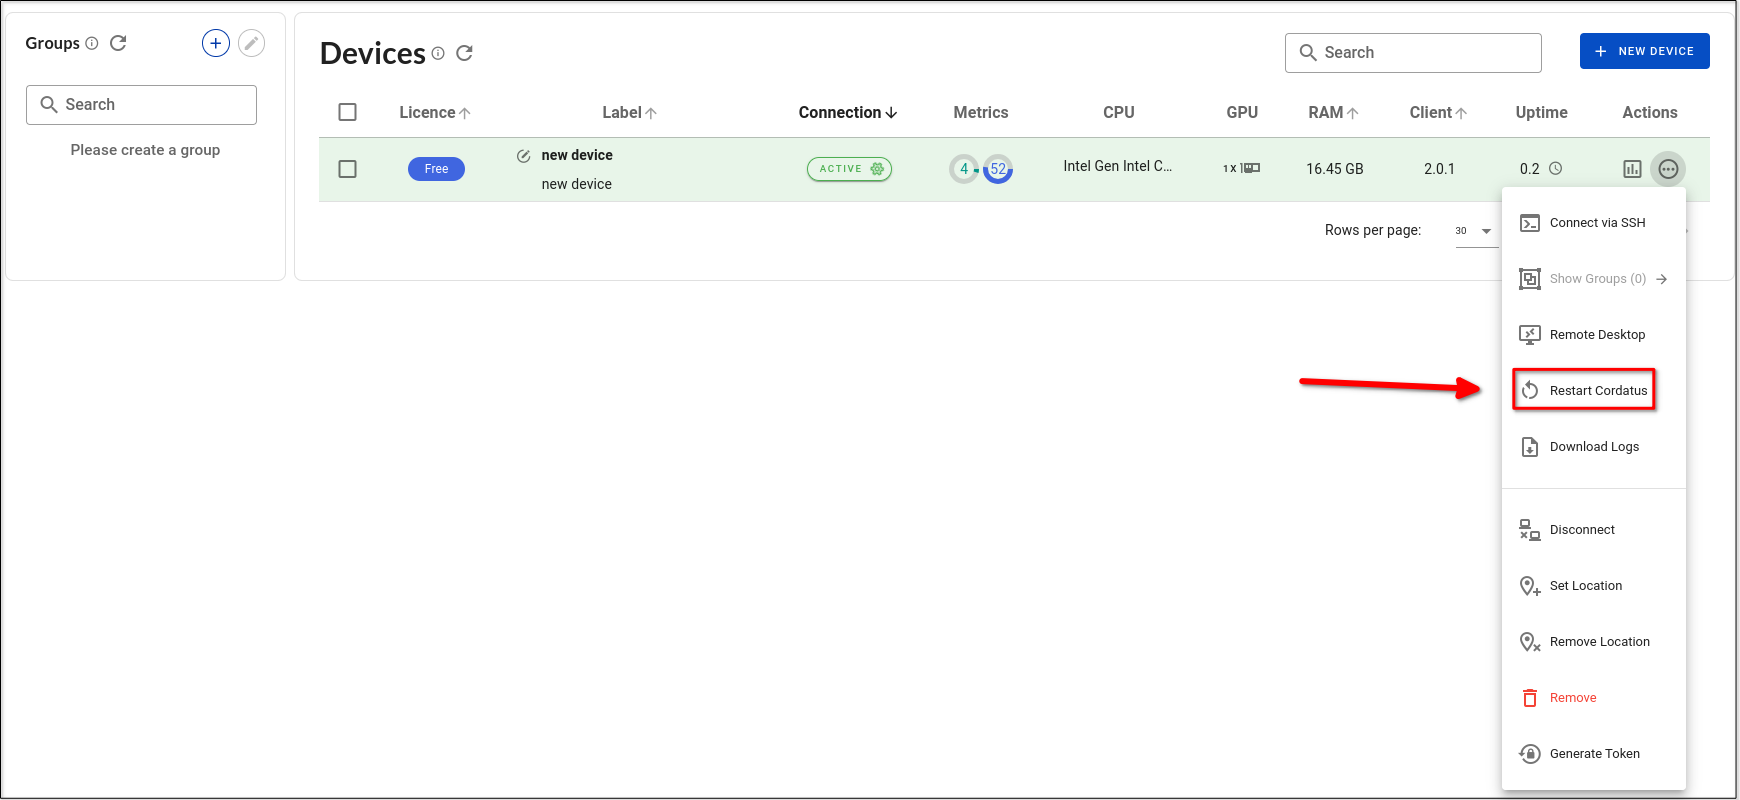
Restarting a Client
To remotely restart a Cordatus client installed on a device using the Cordatus Web Application, click the Restart Cordatus button. You can find this option within the menu that appears when you click the ellipsis icon located under the "Actions" title.
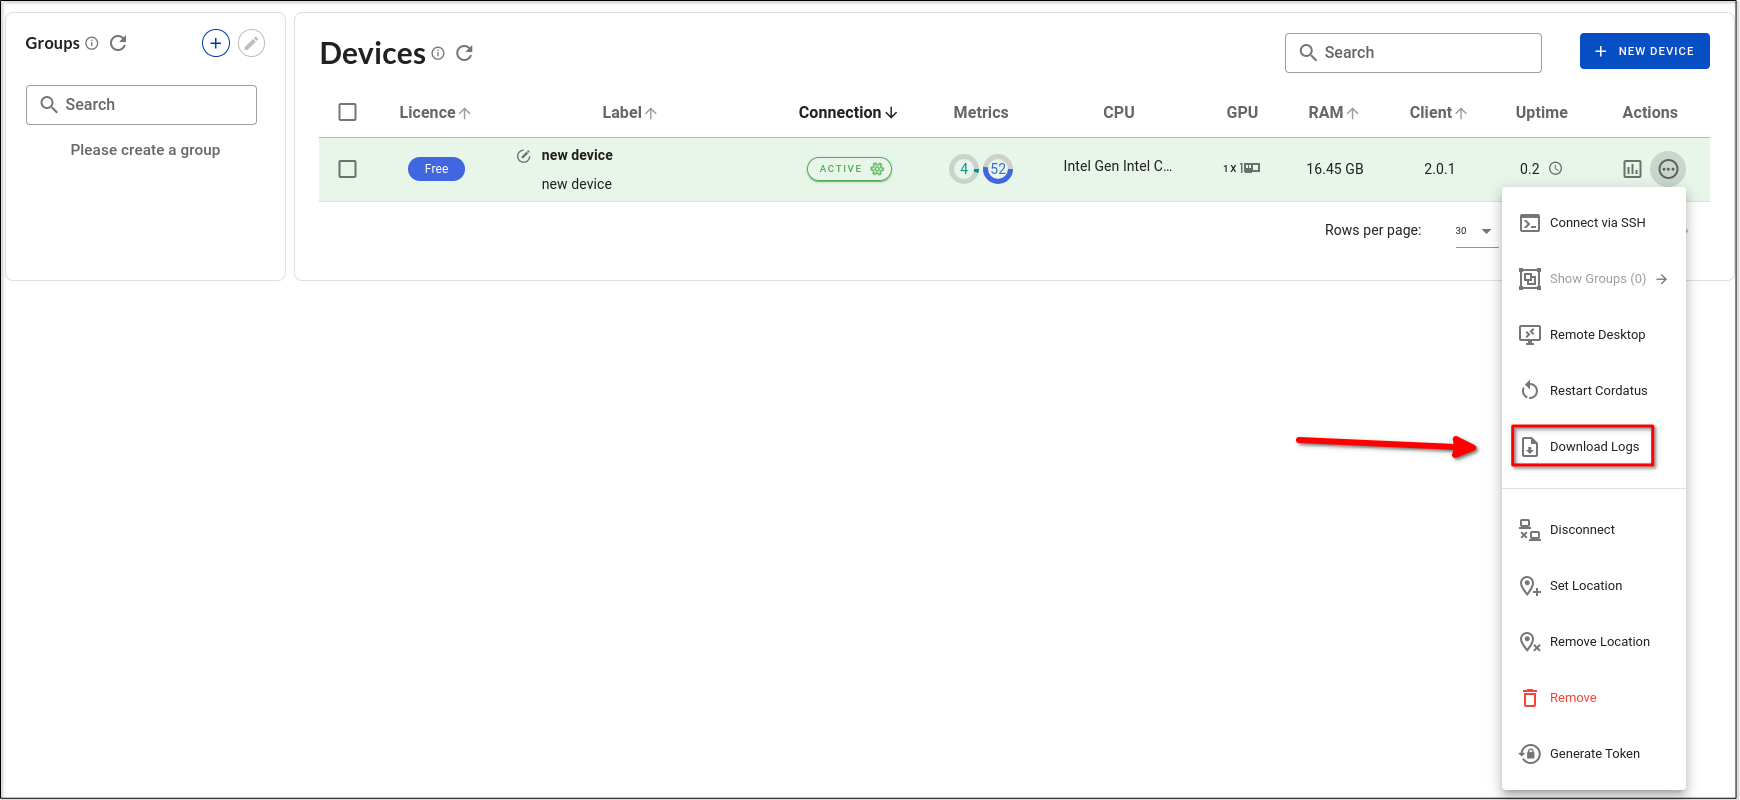
Downloading Device Logs
Users can remotely access the activity logs generated by each device using the Cordatus Web App. To download a device's logs, simply click the Download Logs button. You can find this option within the menu that appears when you click on the ellipsis icon situated under the Actions title.
Changing Device License
Users can change the license of their devices if they wish. If users have spare licenses and want to use them with one of their devices, they can follow these steps:
- Click the Change License button under the Actions column for the device you want to change the license for.
- Click on the Change License button on the menu that opens up.
- From the modal that opens up, choose the new license type you wish for your device.
- From the new panel that opens up at the bottom, choose an available license for your device.
- Click Change License.
Your selected license has been assigned to your device.
Removing a Device
To remove a device from your account, you have two options:
- To remove a device, click on the device you wish to delete and then select the Delete Selected button at the top.
- Alternatively, you can click the Remove button, found in the menu that appears when you click on the ellipsis icon under the Actions title.
- If you choose the second method to remove your device:
- You can choose whether to stop or continue the running engines on the device.
- You can also choose whether to remove the device from your account while keeping the Client and related files on your device, or if you want to remove some or all of the data along with the device's removal from your account.