Recording Stream
The Recording Stream in Cordatus allows users to easily capture, manage, and review video streams from any connected camera.
This feature provides a way to record camera feeds for monitoring, analysis, or archival purposes.
With this functionality, you can:
- Start and stop recordings .
- Access, organize, and manage recorded videos through a simple and intuitive interface.
- Adjust playback speed, jump between timestamps, and customize viewing preferences.
- Save recordings locally and change the storage directory based on your needs.
The following section provides a detailed step-by-step guide to using the Recording Stream effectively within the Cordatus platform.
Why Record Orchestrator?
Unlike traditional VMS (Video Management System) solutions, Record Orchestrator operates independently from the cloud with its distributed recording architecture. This provides:
- 100% Uptime: Recording continues uninterrupted even during internet outages
- Low Latency: Instant access since data is processed on local devices
- Cost Savings: Cloud bandwidth and storage costs are minimized
- Data Security: Sensitive data remains in local infrastructure, GDPR compliant
Core Capabilities
| Feature | Description |
|---|---|
| Universal Camera Support | Works with RTSP, HTTP/HTTPS, ONVIF, and USB cameras |
| Local Recording | Cloud-independent, direct recording to devices |
| Smart Storage | Automatic disk management and old recording cleanup |
| Flexible Scheduling | Calendar-based automatic recording scheduling |
| Infinite Timeline | Access and navigate unlimited historical recordings |
| Multi-View | Simultaneous monitoring of up to 25 cameras (5x5 grid) |
Use Cases
Security & Surveillance:
- 24/7 continuous recording
- Post-incident forensic analysis
- Multi-location centralized monitoring
Industrial Monitoring:
- Production line tracking
- Quality control recording
- Workplace safety documentation
Retail & Commerce:
- Store security
- Customer flow analysis
- Checkout and entry point monitoring
Smart City:
- Traffic monitoring
- Parking area management
- Public safety
System Architecture
Supported Camera Sources
Record Orchestrator supports various camera protocols for seamless integration with your existing infrastructure:
- RTSP: Industrial IP cameras and professional security systems
- HTTP/HTTPS: Web-based streaming sources and video feeds via API
- ONVIF: Standard-compliant security cameras (auto-discovery support)
- USB: Locally connected cameras and webcams
Distributed Recording Architecture
Recordings are stored directly on devices, independent from the cloud. Works on both edge devices and traditional servers. This architecture provides:
- Uninterrupted Recording: Recording continues even when internet connection is lost
- Low Latency: Instant access and fast playback startup
- Bandwidth Optimization: Transfer to cloud only when necessary
- Data Sovereignty: Recordings are securely stored in local infrastructure
To record from a camera, follow the steps below:
Start Recording
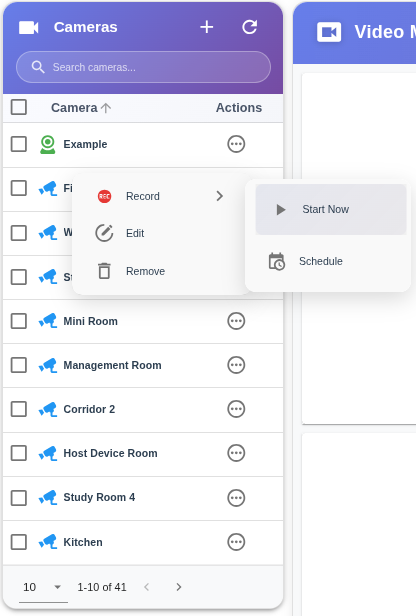
- Go to the Cameras page and open the desired camera.
- Click on the three dots (⋮) next to the camera and select the Record option.
You do not need to open the camera to start recording the record function can be initiated without viewing the live stream.
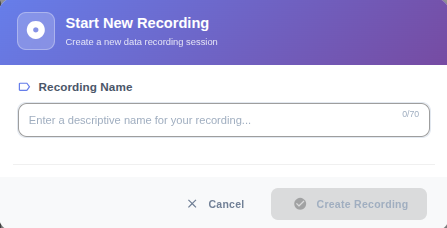
Name the recording.
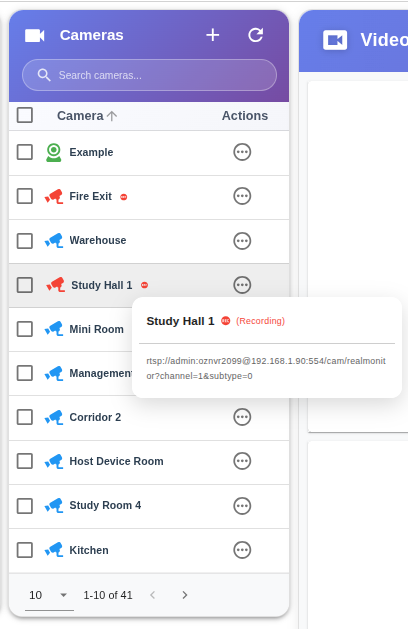
After the recording starts, the camera will turn red.
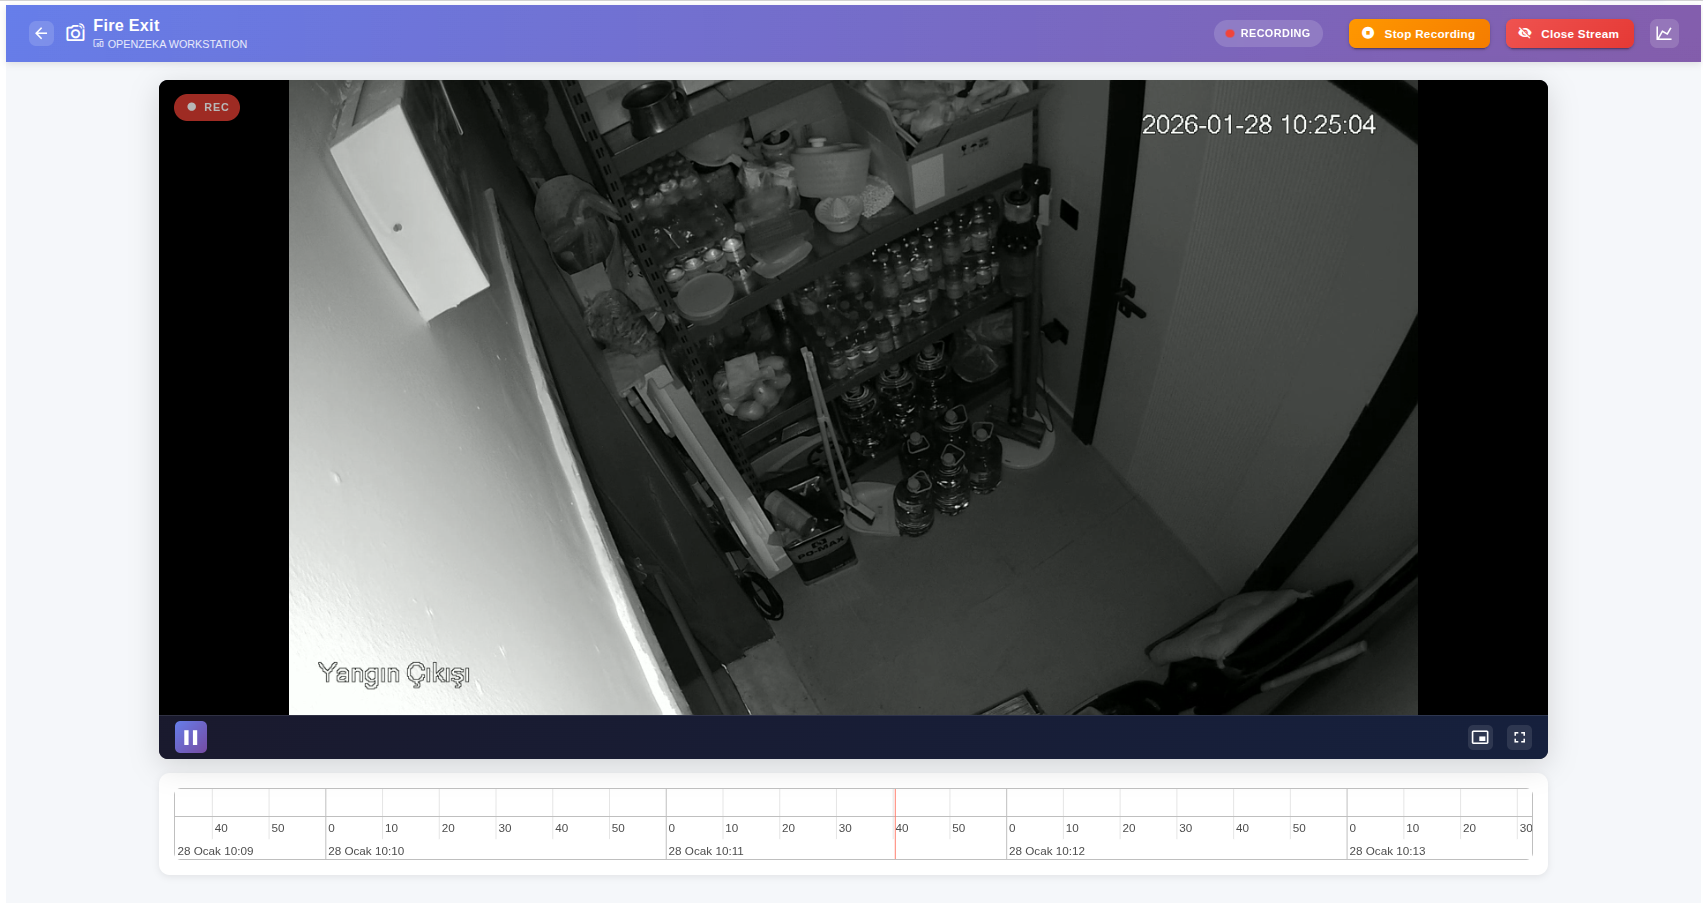
When you click on the camera view , a “REC” label will appear at the top-left corner of the screen, indicating that the recording has successfully started and is currently in progress.
Start Multiple Record
You can also select multiple cameras and click the three-dot menu at the right corner of the Cameras tab, then choose “Start Recording on Selected Cameras” to begin recording from multiple cameras simultaneously.
Alternatively, you can start recording directly from within the camera view by clicking the Record button located at the right corner , no need to access the three-dot menu.
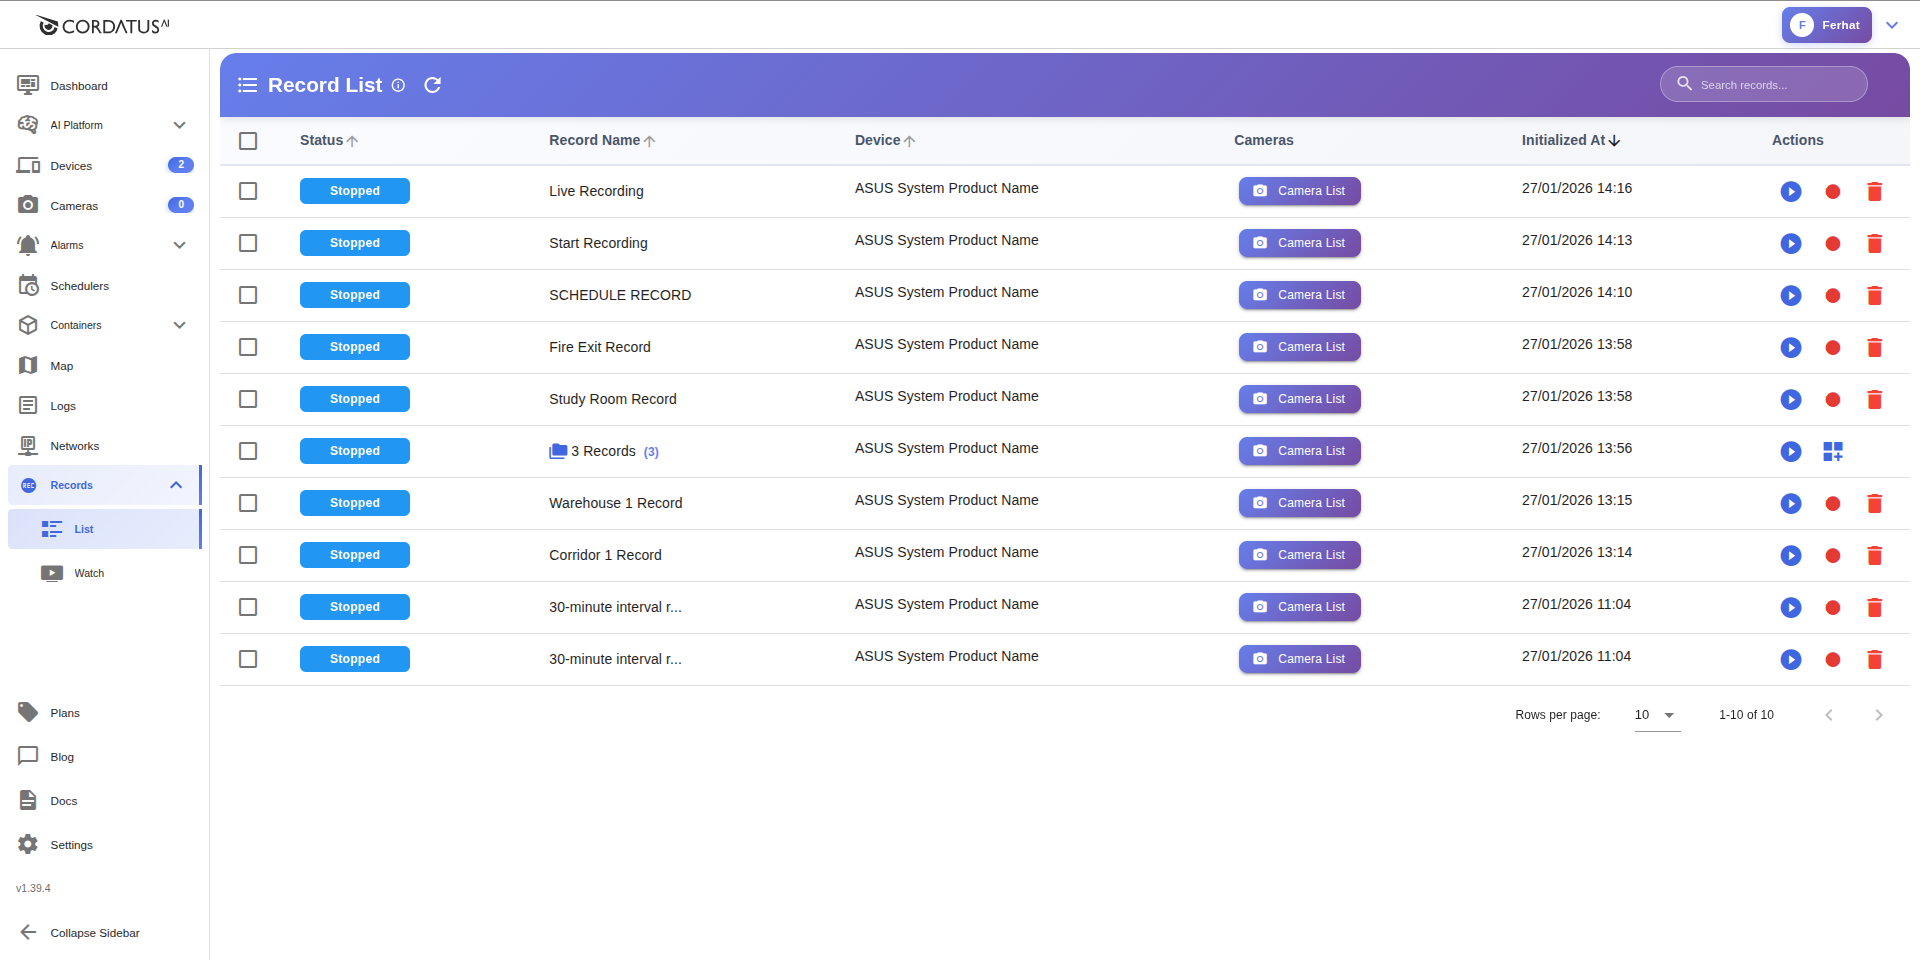
Next, navigate to the List tab under the Record section on the left panel to manage and view your recordings.
On this page, you can easily monitor all your ongoing and paused recordings. You can also pause, resume, or delete them directly from the interface for better control over your recording management.
From the top-right corner, you can search through your recordings, and in the Camera List tab, you can see which cameras have active or past recordings. Using the left-side menu, you can select multiple recordings to delete them in bulk. Additionally, with the Play button, you can restart recordings on any cameras where recording was previously stopped, allowing you to quickly continue where you left off.
Watch Records
To watch a record, go to Watch under the Records section in the left menu. When you open the Watch page, a Select Cameras option will appear in the right corner. Click on it to choose which camera’s recordings you’d like to view.
On this page, you can choose any camera you’d like to view or select multiple cameras at once for a multi-camera display.
To start playback, simply click the Play button next to the desired recording. Or, you can click anywhere within the highlighted section below which represents the recorded time range to jump directly to that specific second of the recording.
Watch Page Features
On this page, you can explore various features related to your recordings. You can rewind or fast-forward the video, as well as adjust the playback speed for example, play at 0.5x to slow it down or 2× to watch it faster, depending on your preference.
Use the magnifier icons located at the bottom-right corner to zoom in on the timeline. This helps you better visualize recordings distributed across days, weeks, or months. Alternatively, you can also use your mouse scroll wheel to zoom in and out for a smoother experience.
From the right corner, you can change the aspect ratio to 16:9 or 4:3 to match your camera’s format and personal viewing preferences. Similarly, users can adjust and modify the grid settings from the same area of the screen. You can also search through your recordings using the search bar at the top-right corner of the page.
Additionally, by clicking “Live” from the left menu, you can instantly switch to the live view of your cameras and monitor their real-time feeds. This allows you to seamlessly move between recorded footage and live streaming without leaving the page.
Grid (Camera Display) Area
You can also move and resize the recording as you wish. Selected cameras are automatically arranged in a grid layout:
| Camera Count | Grid Layout |
|---|---|
| 1 camera | 1x1 (Full screen) |
| 2-4 cameras | 2x2 |
| 5-9 cameras | 3x3 |
| 10-16 cameras | 4x4 |
| 17-25 cameras | 5x5 |
Grid customization:
- Resize by dragging from corners
- Change position with drag-and-drop
Timeline Features
The timeline at the bottom of the screen shows all recordings on a time basis.
Timeline structure:
- Master Row (Top): Combined view of all cameras
- Camera Rows: Separate timeline for each camera
- Blue Blocks: Recording segments
- Gaps: Time periods without recordings
Timeline controls:
| Action | How To |
|---|---|
| Play recording | Click on a blue block |
| Go to time | Click on the desired point on the timeline |
| Zoom | Select View Range (1h, 3h, 6h, 12h, 1d) or use mouse scroll |
| Hide camera | Click the 👁 icon |
| Resize | Drag the top handle |
Timeline navigation and querying:
- Initially, only recordings within your selected time range are queried
- As you scroll the timeline left/right, visible time ranges are automatically loaded
- You can access historical recordings with unlimited scrolling
Camera filtering:
- You can search for cameras from the filter bar at the top
- When you search, only filtered cameras appear clear
- Other cameras become blurred
Master Synchronization Mode
When you click a block on the Master row, Master Mode is activated:
- A pink/purple marker appears
- All cameras synchronize to the same time point
- All cameras with recordings at that time play together
- You can watch the same event from different angles simultaneously
While in Master mode, the recordings play sequentially and synchronously according to time. This means that when one recording ends, the next one automatically starts playing. If no recording is available, a "No Recording" message will be displayed.
Exiting Master Mode:
- Make manual controls (play/pause, forward/backward)
- Select a recording from a different camera row
Video Playback Controls
Each camera's video player offers the following controls:
| Control | Shortcut |
|---|---|
| Play/Pause | Space |
| 10 seconds back | ← |
| 10 seconds forward | → |
| Fullscreen | F |
| Exit fullscreen | Esc |
Playback speeds: 0.25x, 0.5x, 1x, 1.5x, 2x, 4x, 8x, 16x
In the Master section, you can view all your recordings together. For example, if you recorded from multiple cameras simultaneously, clicking on a specific time range in the Master tab will open the recordings from all cameras at that exact moment. To do this, simply click the ‘X’ button marked below with your mouse. You can also open recordings for individual cameras by clicking on the cameras listed under the Master section.
While in Master mode, the recordings play sequentially and synchronously according to time. This means that when one recording ends, the next one automatically starts playing. If no recording is available, a “No Recording” message will be displayed.
In the Record section, you can also filter between cameras. As you type a camera name, all other camera views will be blurred except the matching one. If you want to move that camera to the top of the Master list, simply click the button located on its right side. This will pin the selected camera to the top of the list.
You can also switch to the Live view at any time by clicking the Live button, allowing you to monitor the camera’s real-time feed instantly.
Set Recording Storage Location
All recordings are automatically saved to your local system. By default, they are stored in the following directory:
home/<user_name>/.cordatus/Records
You can modify the default save directory by navigating to the Device screen, opening the Storage Info tab, and updating the path in the Video Records section.
Additionally, Cordatus allows you to configure how the system should behave when the available storage space on your device becomes low during recording. You can choose one of the following options:
-
Delete old files:
Automatically remove older recordings to free up space for new ones.
This ensures continuous recording without manual intervention. -
Stop recording:
Automatically stop the recording process once the available disk space reaches the configured threshold.
This prevents data loss or corruption due to insufficient storage.
You can also define the storage threshold the specific amount of free disk space (in gigabytes) that triggers one of the actions above according to your preference.
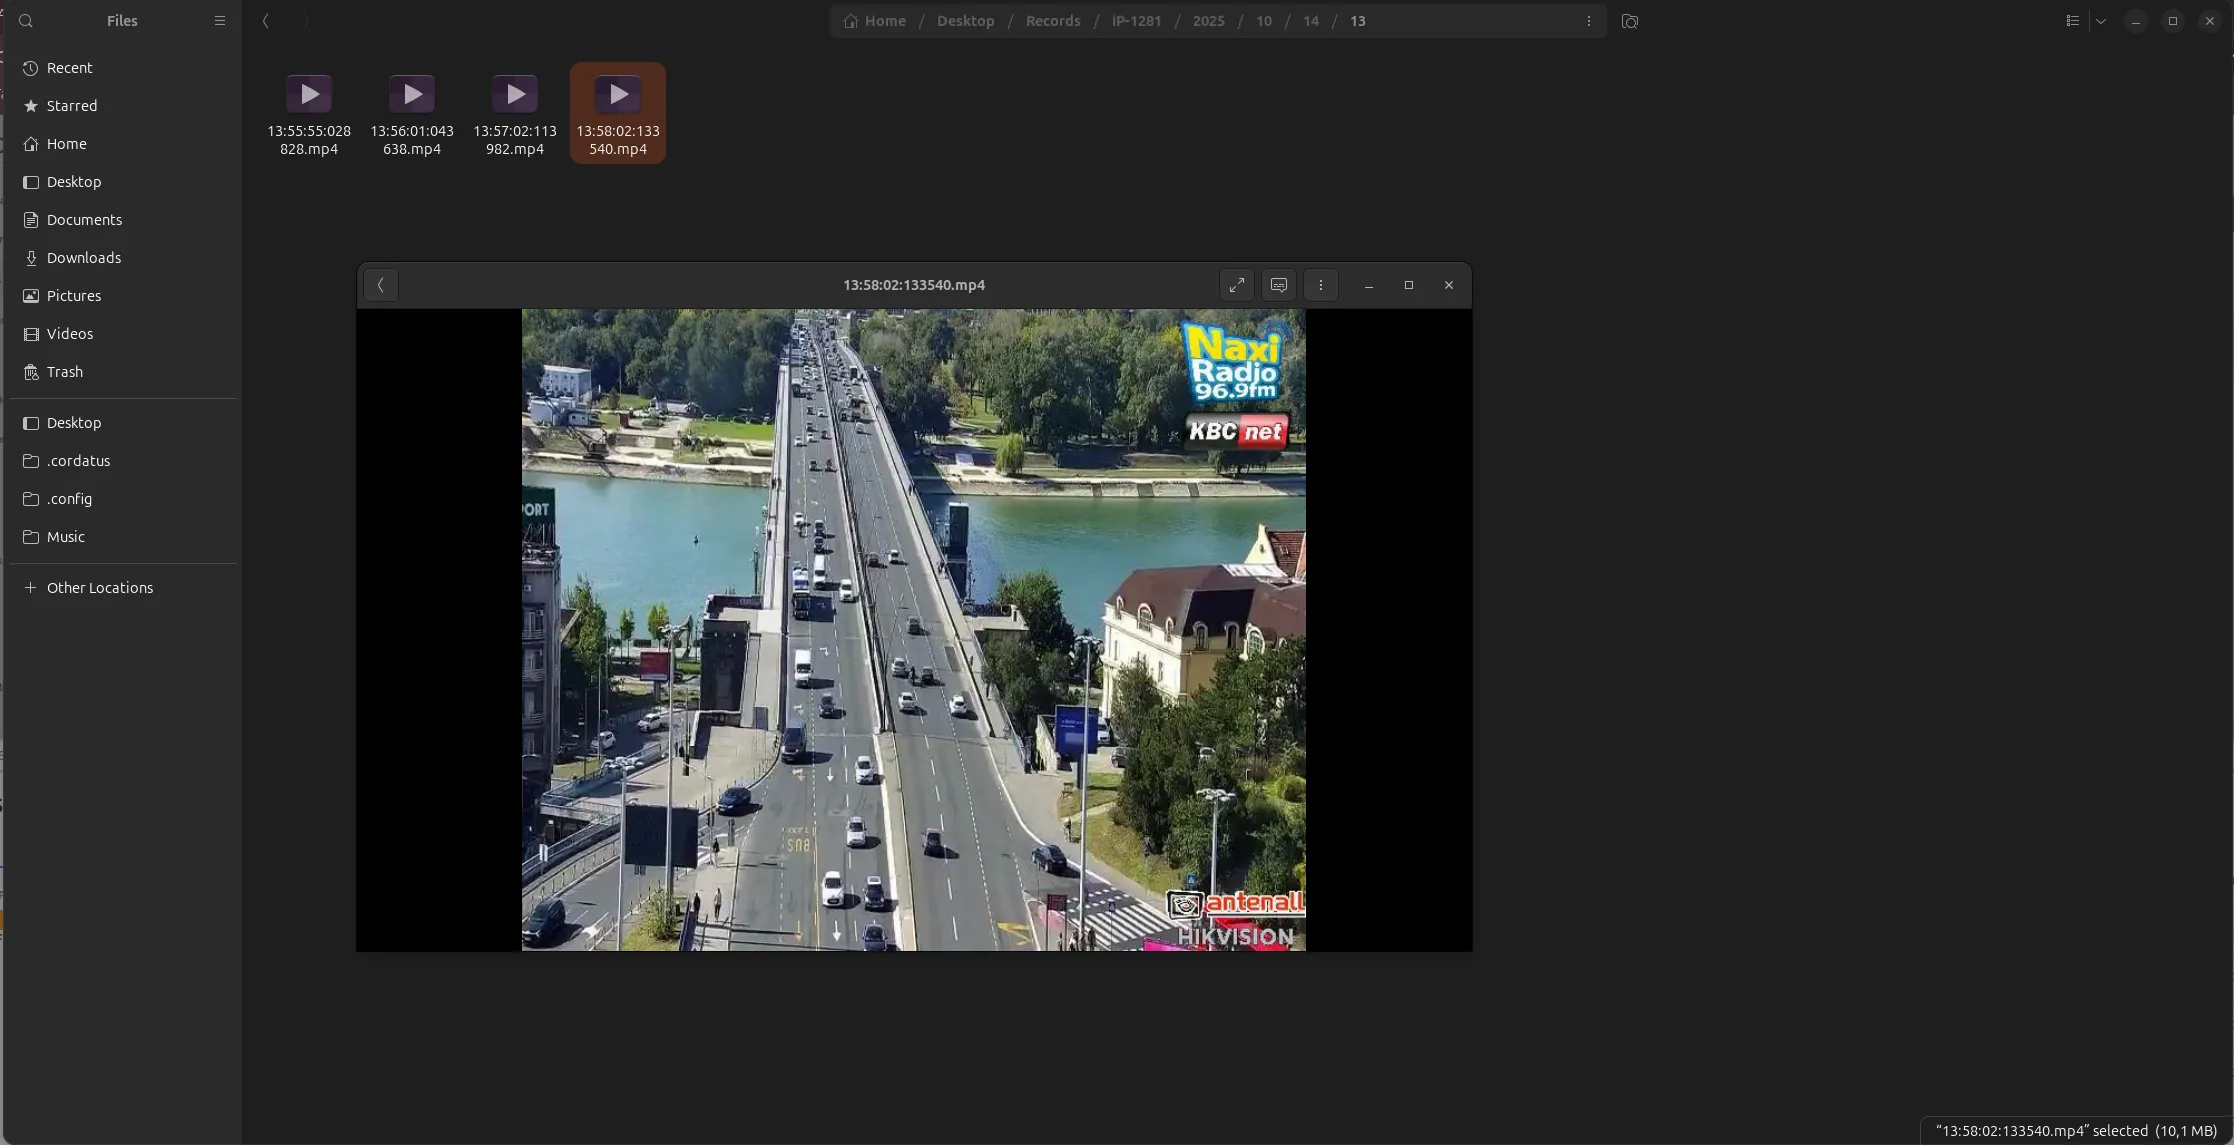
All camera recordings are automatically saved to the folder you select through the application. The recordings are stored in a structured format, allowing you to quickly find the footage you’re looking for.
The folder structure is as follows:
Camera_ID/
 ┣━ Year/
 ┃  ┣━ Month/
 ┃  ┃  ┣━ Day/
 ┃  ┃  ┃  ┗━ Hour/
With this structure, each camera’s recordings are kept in its own folder. For example, when you want to locate a specific recording, you can first open the folder based on the camera’s IP address, and then easily find the file according to the date and time.
Delete Records
You can delete recordings from the Records page:
- Find the recording you want to delete
- Click the 🗑️ (trash) icon
- Click the "Delete" button in the confirmation window
Delete operation:
- Both database records and video files are deleted together
- Device connection must be active for delete operation
- Delete operation is not allowed if device connection is unavailable
⚠️ Warning: Delete operation cannot be undone!
Restarting & Updating the Stream Engine
Cordatus.ai includes a Stream Engine, a core component responsible for handling all live camera connections, recordings, and playback operations.
If you encounter any issues such as recordings not starting, cameras not appearing, or the live stream freezing, it’s often related to the Stream Engine’s status.
-
Open the Client Application
Launch the Cordatus client and navigate to the Stream Engine panel from the left menu.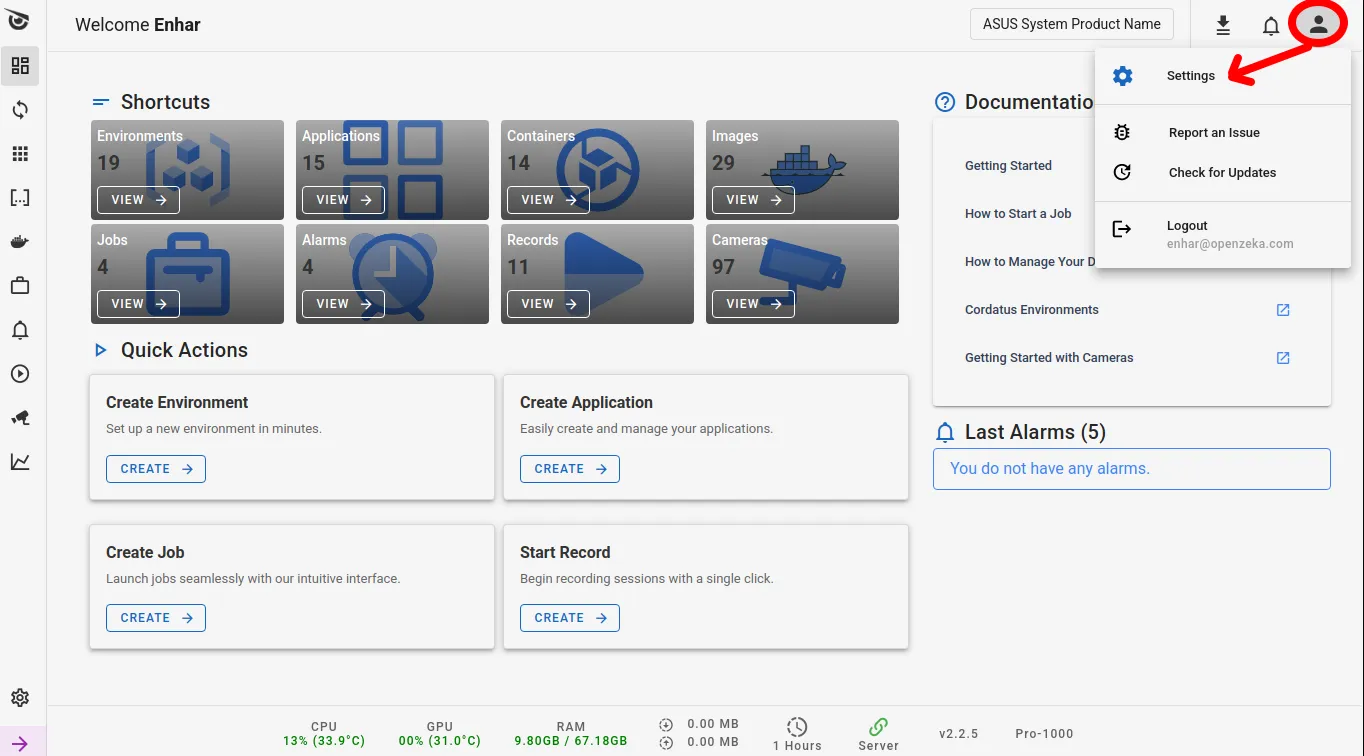
-
Verify That the Stream Engine Is Up to Date
Make sure you’re running the latest version of the Stream Engine.
An outdated version may cause compatibility issues or prevent new features from functioning correctly.
If an update is available, you’ll see an “Update” button click it to install the latest version automatically. -
Restart the Stream Engine
After confirming the update, click the Restart button to reload the service.
This action refreshes all camera connections and resolves temporary glitches without affecting your saved configurations.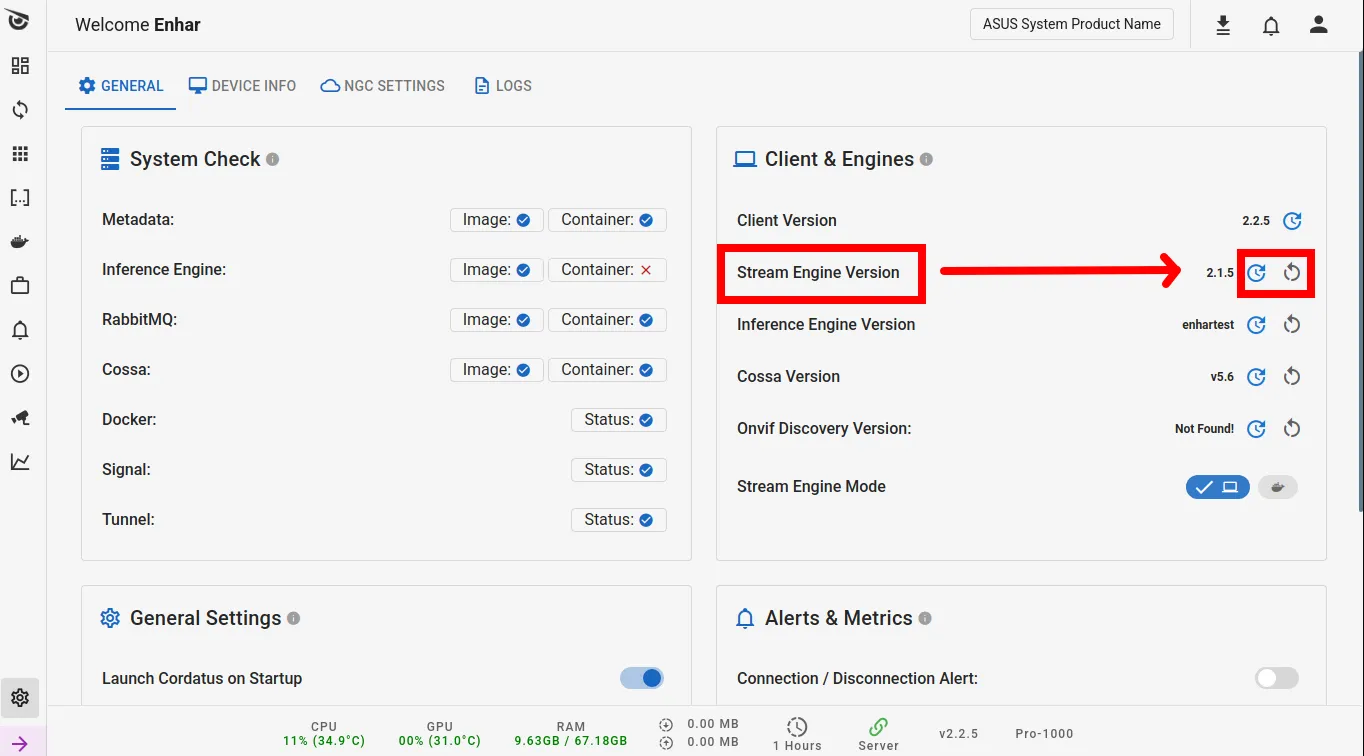
-
Recheck Your Cameras
Once the restart is complete, return to the Cameras page to confirm that all devices are reconnecting properly.
If the cameras still do not stream or record, try restarting the application itself.
Restarting the Stream Engine while recording will not interrupt or stop your active recordings, so you can safely restart it at any time without worrying about data loss.
Tips & Best Practices
- For performance, don't select more than 25 cameras at once
- Prefer specific time periods over wide date ranges
- Keep timeline view range at 1-3 hours for better performance
- Use Master Mode for multi-camera analysis of the same event
- Name recordings in Date-Location-Event format (e.g., 2026-01-27-EntryGate-Shift)
- Regularly check your storage settings to avoid running out of disk space
- Use the "Delete old files" strategy for continuous recording scenarios